| |
CHASSIS OPTIONS
As mentioned earlier, there are a ton of chassis styles
available. One of the most impressive and expensive ones we checked
out was the Stick Chassis from The
Crawler Store. The design is simple and the performance looks amazing.
We also checked out the NN Chassis from The
Crawler Store as well as the CX Chassis from
RC Back Yard . We finally decided that despite our love of the simplistic
Stick design, we really wanted the look of a 4-link crawler setup.
Here are just a few crawling chassis's to check out:
The Crawler
Store - the Stick and the NN
RC BackYard
- the CX
RC Guy - The Gecko,
Gecko II, and 60/40 Pro Kit
RC4WD - RockBull
UTRCRC
- vPrime and V3
InetRC - Various chassis
designs
Custom Crawlerz -
Custom designs
A simple Google search
will yield many more than the list we have provided. The key thing to know here is that you could buy any of the
above chassis and skip the entire chassis fabrication ordeal. Making
your own chassis is a great deal of work and will take quite some time
to complete. As with any "from scratch" project, be prepared
to scrap everything and start over if you make a mistake or miscalculation.
It can however be very satisfying knowing that you made your chassis
all on your own. We had a great time building ours!
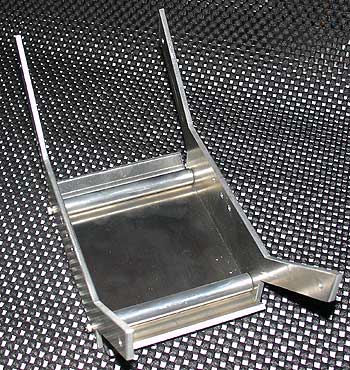
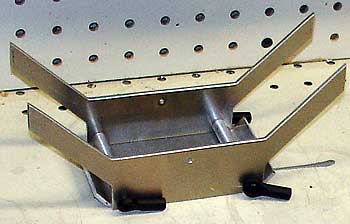
Ok....onto the chassis build. A twin vertical plate design
seemed desirable as it would provide lots of mounting points for our
shocks and axle links. We started by sketching out some different designs
on graph paper and once we had one we were happy with, we grabbed some
3mm thick 6061 aluminum plate and hit the band saw. To ensure a semi-accurate
replica of our design, we cut out a template from our paper drawings
and transferred it onto the aluminum plate. After cutting out our design,
we took the plates to a wide belt sander to make the edges smooth and
straight. This took a little time and effort but it was well worth it.
Keeping everything symmetrical is very important. If both sides were
not the same, it would create a crooked chassis and that would be trouble
when we started bolting everything together.
Once the plates were done, we determined the desired width
of the inside of our chassis by checking the ESC specs. The Novak XR
Super Duty Electronic Speed Control would require 1.75” x 2.17”
(44.5 x 55.1mm) of mounting space. Room would also have to be made for
the receiver, a Traxxas 2215 AM unit.
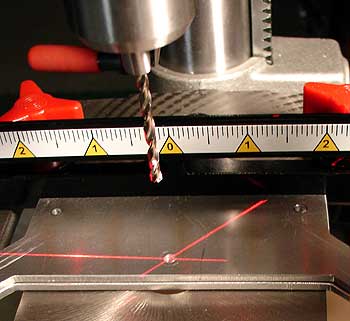
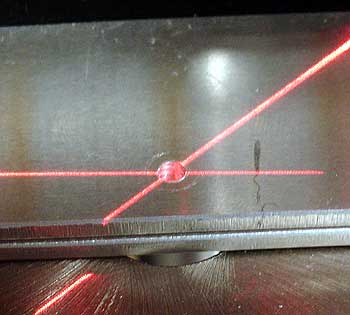
We cut several lengths of 3/16" aluminum rod to act as chassis
plate spacers/supports. We felt it was crucial that these rods have
the center holes drilled perfectly to achieve a straight, level and
even chassis. These spacers were put in a metal lathe (like this one
from Grizzly)
and the center holes were drilled and tapped for 4-40 cap screws. Most
people do not have a metal lathe however you could find a local metal
working shop and have them drilled for a few bucks. It is a very simple
procedure. If this is not an option, you can use similar driling techniques
as shown in Stage 5, How to create
your own axle mounting links.
SKID PLATE
Once the main chassis was complete and screwed together, we moved on
to the lower skid plate / electronics mounting plate. The skid plate
was to act as a skid device as well as a place to mount the electronics
and battery. We originally planned on using this plate allow us to remove
all the electronics by removing two screws however we ended up adding
another plate inside the chassis to house the battery, ESC and receiver
(you will see more pictures of this in Stage
7 of the project).
We used the same 6061 3mm think material as the chassis side plates
to make the skid plate. That might be a little overkill but what the
heck! We put a bend on the front and rear end of the plate to prevent
it from getting hung up on rocks. You can use a vise to do this or ideally
(what we used) a metal bending press brake (like this one from Grizzly).
OUR PROJECT CRAWLER DIMENSIONS/SPECIFICATIONS
Wheelbase: 17.5"
Overall Truck Length (fully assembled): 24"
Ground to axle clearance: 2.25"
Center Ground Clearance: 5" (max); 4.3" (normal
resting height)
Click here to check out STAGE 5 of Project Rock Ripper.....Steering and Axle Mounting Links.
|