| |
||
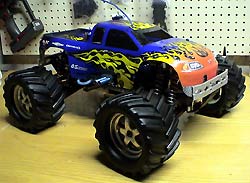 |
We know that everyone can't afford $2000 in parts to hop-up their truck. Project JUMPMAXX is our attempt at taking a basic T-Maxx and making it jumpworthy on a budget of less than $400. We will break it down piece by piece so even if
you don't have that many smacks burning a hole in your wallet, you can select what parts you do want to invest in and in what order. We have tried to focus on components that will significantly reduce the common problems associated with BIG jumping (broken a-arms, blown shock caps, busted shock towers, bent turnbuckles, etc). After all, nothing will ruin an afternoon of bashing fun faster than a handful of broken components. Now we know that there are a million and one different ways to go about building a jump truck. You can go with aluminum, high strength plastic, etc. Everyone has a different opinion on what works. The fact is a lot of different component combinations work. The parts we have chosen for this particular project are readily available, high quality pieces and budget minded without sacrificing performance. We wanted to start with a somewhat basic T-Maxx so we chose to use "Old Blue", a "old style" T-Maxx (a BYT favorite). Old Blue has a few minor engine upgrades. Our feeling was that this would not effect the jumping performance of the truck (the OS is getting a bit tired anyway). Remember our goal is to keep the truck from breaking (as often) when jumping. Here's what we started with:
 | |
| ||
| ||
| |
|
||||||


|
|||||||||||
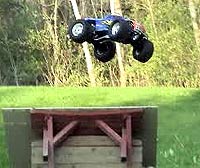 |
We have burned a gallon of nitro through our JUMPMAXX and have done nothing but jump, jump and jump some more. We put the truck through a variety of different jumps ranging from 1 foot tall to 4 feet tall (what we thought the average basher would be doing in their own back yard). So what happened? BYT had a BLAST!!! And we didn't break anything (no matter how hard we tried). We purposely hit the jumps sideways and off center just to see how the truck would handle the landings. The results were plush and would make even the most inexperienced driver look good. The following clips illustrate the smooth landing ability of JUMPMAXX: jumping (639kb) jumping (338kb) more jumping (445kb) and more jumping (414kb) |
||||||||||
|
|||||||||||
 RC Raven Springs (top) Traxxas Big Bore Springs (bottom) |
|
||||||||||
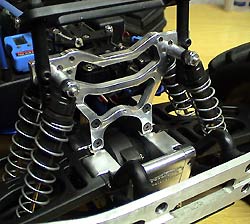
 Traxxas Big Bore Shocks with RC Raven Dual Rate Springs |
The only thing we would change with this setup is moving to heavier weight oil in the shocks. We have been told the Big Bores come with 30 weight oil in the package. This may be a personal preference but we think a heavier weight shock oil would make for a better driving truck and stiffen things up a bit. This is a GREAT upgrade and worked very well with the springs we chose. UPDATE: We have changed the shock oil to 50wt and it is awesome. Still, after months of BASHING, no leaks, no shock trouble! These are a great investment.
|
||||||||||
 RC Raven Aluminum Shock Tower |
After several (20+) nasty landings, we did manage to put a slight (very slight) bend in one of the rear shock towers. It was easily straightened. Let us stress... we were being VERY hard on the truck and purposely landing it on anything but the wheels (the stock "Old Blue" body is in really bad shape after all of this). We recommend these towers to anyone who wants to add some adjustability to their suspension. Not to mention they are awesome looking!
|
||||||||||
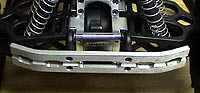 RC Raven Aluminum Bumpers  Bumper mount trim job |
We did have to re-tighten the bumper mounts (bumper mount to bulkhead) at the end of each day, even Loctite would not hold. Hey! Something has to give! These bumpers worked great. Bonus... the grass and mud stains cleaned off easily at the end of each day. They were a little rough when we received them. We needed to remove some of the excess material around the inside edges of the bumper and the corners. Not a big deal especially for the price and the performance. some rear bumper abuse (639kb) more rear bumper abuse (445kb) and more bumper abuse (506kb)
|
||||||||||
 Great Assembly RC Aluminum Braces  Great Assembly RC Rear Link Brace
 |
When
we received our 6061
Aluminum Bulkheads and Braces package from Great Assembly RC, we were
nothing short of impressed. The kit includes all of the hardware needed
along with super meaty aluminum bulkhead braces. The bulkhead set was
packaged very nicely and installation was a treat. Everything lined up
perfectly. The machine work is quite nice. There are access holes machined
into the bulks to make tightening the lower shock tower bolts very easy.
THIS IS A GREAT FEATURE!! Way to go Great Assembly! The kit also includes an excellent set of bulkhead braces. Constructed of solid aluminum and beefy in size to say the least (see picture at left with comparison to stock braces). It also includes a rear link brace (see picture at the left). To say the least, this is a very complete kit with nice added features compared to the stock setup and also when compared to many other aftermarket bulkhead sets. All we can say is if the 6061's are this good, the 7075's must be off the charts!
|
||||||||||
  FullForce RC Black Oxide Screw Kit |
We gave the JUMPMAXX a severe beating and not once did we have a screw become damaged in any way. BYT says "Not having to screw around with bent, broken or stripped screws....priceless!" Save yourself some time and aggravation when working on your truck. Get this sweet screw kit NOW!!!
|
||||||||||
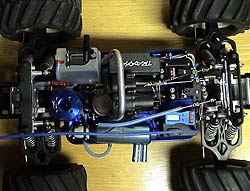
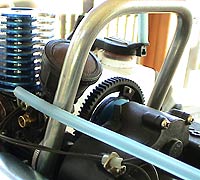  FullForce RC Aluminum 2-Point Roll Bar |
We have used other roll bars that bolt into the bulkheads etc and they work well also. However the FullForceRC roll bar is lighter in weight than others we have used and that's a bonus, especially when we have added some weight with all the aluminum goodies on the truck. It is inexpensive and good cooling head/engine protection!!! We are running a Dynamite Ultra Performance head on the truck and the bar is higher than the head (see the picture to the left). If you are running a larger (taller) cooling head than this, you might wish the roll bar was slightly higher for additional protection.
|
||||||||||
 Pro-Line Maxx Performance Suspension |
|
||||||||||
 RC Rocket Aluminum Chassis Braces |
|
||||||||||
 Traxxas Stainless A-Arm Pins |
They held strong throughout the beatings, much better than the stock ones have in the past. Certainly worth the money (note: these are a required item when using the Aluminum bulk heads)
|
||||||||||
The following items from RC Raven were included in Project JumpMaxx: Shock Towers - if you haven't seen these yet, you need to stop and take a look. Dual Rate Shock Springs - an essential jump item. Aluminum Bumpers - a nice touch that beefs up the front and rear of the truck. The following items from FullForce RC were included in Project JumpMaxx: Screw Kit - the stock screws on a T-Maxx are not strong enough for serious truck beating...these are trick! Roll Bar - bad landings are almost guaranteed once in a while. This little beauty is great for protecting the truck vitals. Great Assembly RC (if you haven't seen their stuff yet....it's time to crawl out from the rock you've been living under) has treated us to a full set of 6061 Aluminum bulkheads and braces. These are some gorgeous parts and the price can not be beat for what you get. Tired of replacing plastic bulk heads? Quit screwing around and hook up with Great Assembly RC.The following items from Great Assembly RC were included in Project JumpMaxx: 6061 bulkheads and braces - take a peek at these bad boys and the rest of the Great Assembly site. We also added a set of Big Bore Shocks to the project truck. We have matched them up with the RC Raven Dual Rate Shock Springs. We also slipped in a set of Traxxas stainless steel suspension arm hinge pins.
 We truly enjoyed all of the components we tested and felt each of them offered a unique benefit to our project. SO...what gives you the most bang for the buck? In our opinion, it is a three way tie for first place. The combination of springs and shocks with the suspension kit are probably the best way to get into the jumping scene. Followed closely by the bulk heads (these are awesome) with stainless a-arm pins , screw kit and roll bar. After that the chassis braces, shock towers and bumpers. We truly enjoyed all of the components we tested and felt each of them offered a unique benefit to our project. SO...what gives you the most bang for the buck? In our opinion, it is a three way tie for first place. The combination of springs and shocks with the suspension kit are probably the best way to get into the jumping scene. Followed closely by the bulk heads (these are awesome) with stainless a-arm pins , screw kit and roll bar. After that the chassis braces, shock towers and bumpers. The order in which you decide to go about building your own jump truck may vary and that's ok! We hope that we have helped you decide where to start. By no means are we finished. We will be attacking a JUMPMAXX Stage 2 at a later date. This time we will add horsepower (for higher jumps) and much more. Stay tuned and be sure to send us your jumping photos and videos so we can add them to the site! The items used on our projects will also be reviewed individually on our Product Reviews page. Do you have an idea for a project? Contact us and we will check it out! |
||||
© Copyright
2001-2006 Beat Your Truck. Site best viewed at 800x600 or higher with Internet Explorer 5.5 or higher.
Advertise with Beat Your Truck * Donate to Beat Your Truck
Advertise with Beat Your Truck * Donate to Beat Your Truck