Project Axial AX10 - Trail Basher
   INTRODUCTION   
Beat Your Truck Project B-Maxx - Custom Brushless E-Maxx

Yes, we know.  The idea of stuffing a brushless motor in an E-Maxx has been around for a long time and done many times and many ways.  The simple fact is that BYT has never done it.  And now with the Castle Monster Combo and so many other killer E-Maxx parts on the market, we feel this is the perfect time to whip one of these missiles up from scratch. 

As with any project, a lot of the creative ideas and paths come from vision of the person who is building the rig.  We all have different visions of perfection.  If you are thinking about building a machine like this for yourself, we encourage you to use our build as a starting point, or reference.  Then give it your own flair!


The plan:
  • Start with a GorillaMaxx G4 Race Chassis
  • Build a tough drivetrain using a 3905 Emaxx transmission
  • Utilize GARC bulkheads, GARC diff cases and upgraded FLM diff gears
  • Power the rig with the Castle 2200kv Monster Combo from Holmes Hobbies
  • Use lithium power from Zippy
  • Add in some trick E-Maxx items from FullForceRC
  • Upgrade all hardware to FullForce RC 12.9 black oxide
  • Upgrade the shocks to Pro-Line Power Strokes
  • Bolt on FlexTek RC titanium suspension arms
  • Add some misc items from MIP, RPM and others to fully trick this ride out
  • Ultimately end up with dependable Maxx that we can tear up the pavement or dirt or anything we want to!
Beat Your Truck Project B-Maxx - Custom Brushless E-Maxx

   THE FOUNDATION (GorillaMaxx G4 Race Chassis)   


There are a lot of choices when it comes to choosing a Maxx chassis.  After some careful deliberation, we decided to use the GorillaMaxx G4 Race Chassis (part #: GMX08-CH).  Now, the first thing you might say is “Hey…why a race chassis?  This is a RC bashers site.  True.  Read on oh doubtful one.

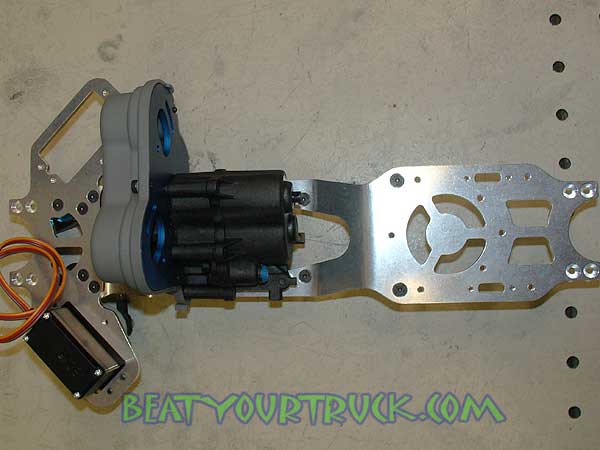
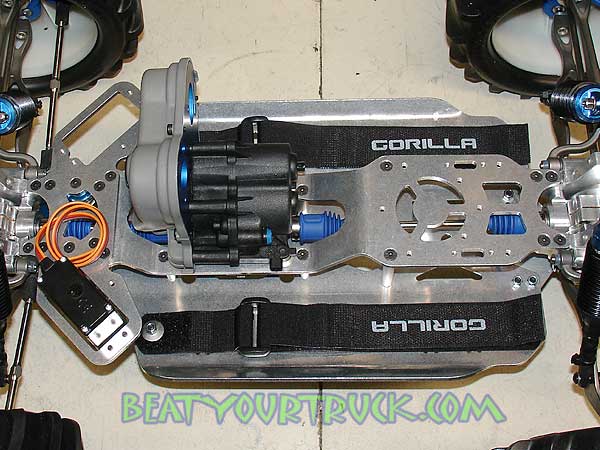
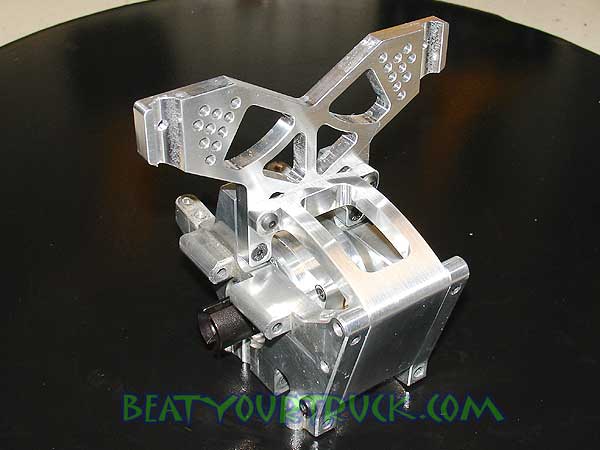
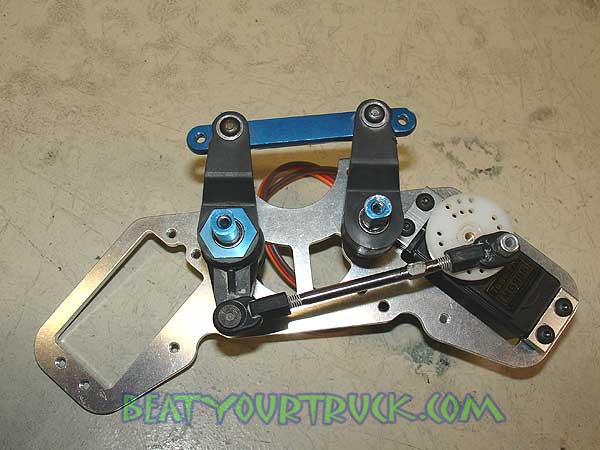
The real appeal of the G4 to BYT was the lowered transmission mounting, lighter weight and overall lower stance.  This truck is going to be a ballistic missile and we wanted the main foundation to help promote stability and strength.  The main chassis deck is 3/32” thick and the upper deck and servo mount plate are 1/8” thick!  The layout provides lots of mounting options for the electronics of your choice.  In fact, GM gives you mounting holes for single, dual or Novak EVX ESC's.  Nice, even though we are not going the 
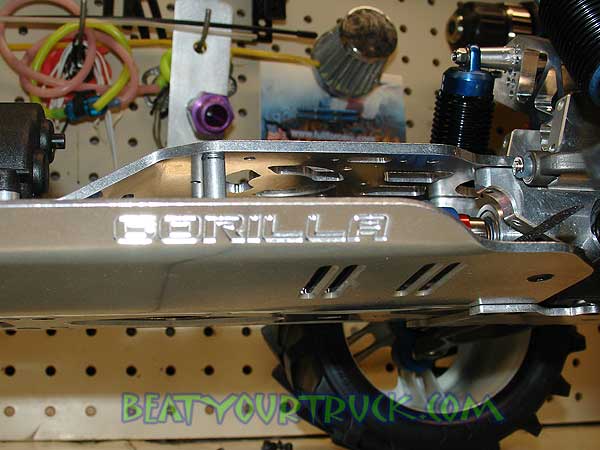
Novak route, many people use them in E-Maxx's. 

The G4 chassis comes with all the screws you will need to do the job from Hexscrews. GorillaMaxx has you covered!

We already had a complete FullForce RC 12.9 black oxide Maxx screw kit on hand and decided to use the FFRC screws throughout the entire truck. We're sure the G4 hardware is great stuff but we went with the FFRC screws as they have always performed well and we wanted all the hardware to match instead of having a gray and black mix.
Beat Your Truck Project B-Maxx - Custom Brushless E-Maxx

Another thing we liked about the G4 chassis is the lack of traditional chassis braces underneath.  This gives you some idea on how much GorillaMaxx really did to reconfigure the entire drivetrain layout for a low center of gravity.  The entire chassis is 15% lighter weight than stock, made from 6061 aluminum, and you get a set of infamous GorillaMaxx Velcro battery straps (super nice straps!).  GorillaMaxx claims it to be “stick pack or lipo ready” and we agree.  You have room for two packs.  We fit up dual 6 and 7-cell NiMh stick packs with no difficulties.  If you go the route we did with one large lipo pack rather than two separates, know that you’ll be limited to a 5S pack.  If you want more than 5S, go with two smaller packs, one on each side, and run them in parallel. 

You’ll need to assemble the G4 chassis and a nice set of instructions 
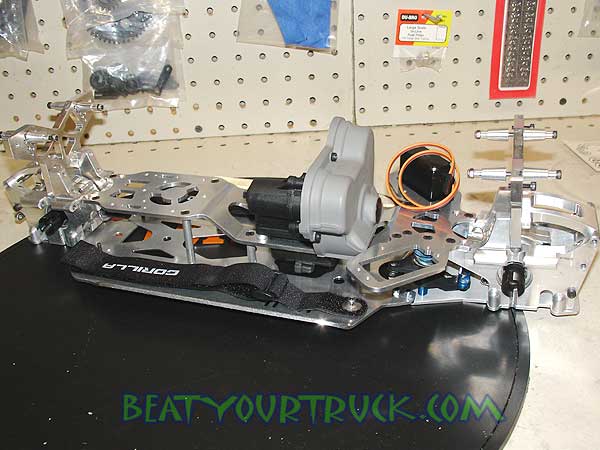
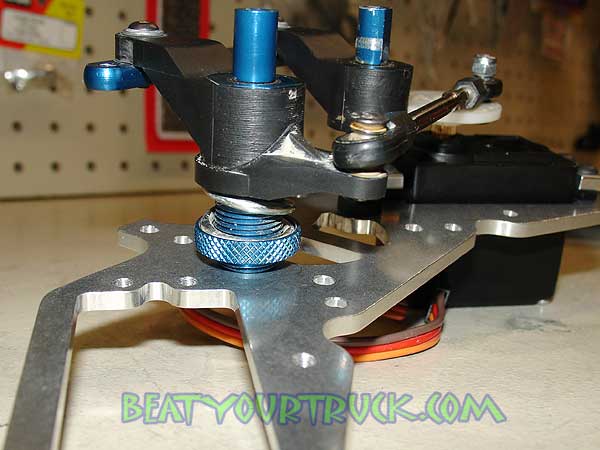
come as part of the package.  Assembly is a breeze and when completed, you are left with one serious looking chassis.  It feels lightweight yet incredibly rigid.  We liked the upper deck concept as everything from the transmission to the front plate where the steering servo(s) mount is extremely well laid out and easy to work on. In fact, everything on the truck is easier to work on with this chassis. We love it!

GorillaMaxx
deserves a BIG pat on the back for this chassis. We are extremely impressed to say the least and could not find one thing to complain about.

Beat Your Truck Project B-Maxx - Custom Brushless E-Maxx


   PUTTING THE POWER TO THE GROUND (GARC diff cases and bulkheads, FLM upgraded diff cups, MIP and Traxxas CVD's, 3905 Emaxx tires, 3905 E-Maxx transmission)   

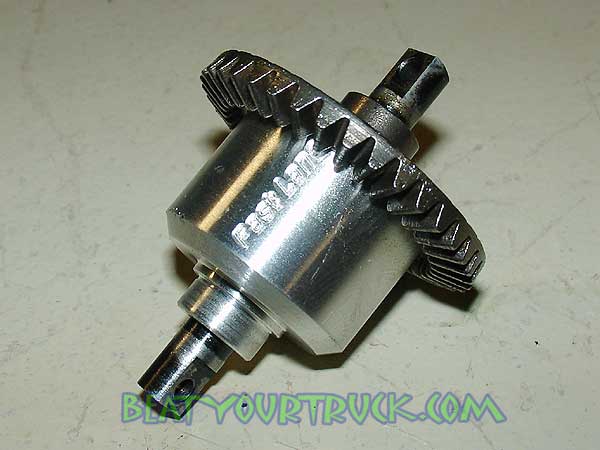
We knew that handling the power of the Castle Monster Combo would be a chore.  The drivetrain would need to be built-up substantially if it was going to even get half a chance of surviving! 

DIFFERENTIALS – We started with a set of Great Assembly aluminum differential cases to eliminate case flex and keep our gear mesh right where we wanted it.  The differential cups were upgraded to Fast Lane Machine (part number: 51500) which are made from 7075 aluminum and have been modified to utilize 3mm screws to attach the ring gear to the diff cup.  NICE!  Without this addition, we would have been doomed to a future of sheared off screws and/or busted cups.  The two brands fit together tight.  Tight enough that we had to use a thin sheet of gasket material between the case halves to get the mesh right.  Not a big deal but something
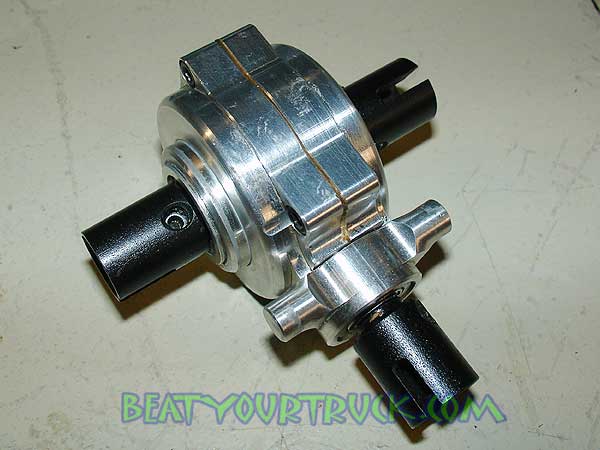
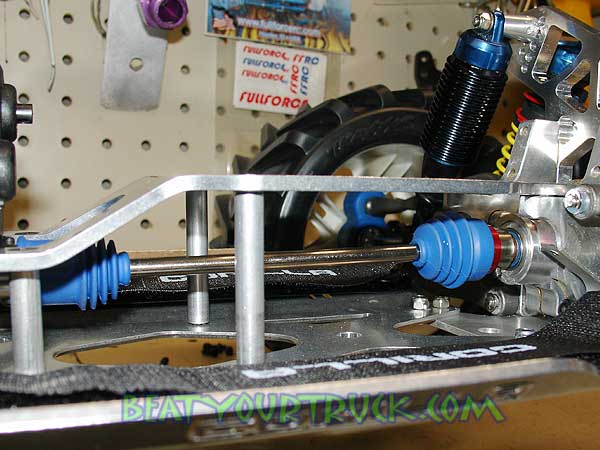
 to make note of. 
Beat Your Truck Project B-Maxx - Custom Brushless E-Maxx

BULKHEADS AND CUSTOM BULKHEAD BRACES – We stuck with our favorite bulks, a full set of Great Assembly 6061 bulkheads.  We have used these bulks in every heavy duty Maxx build we have done for the past 6 years and they have never let us down.

Sweetride4me, a member of the BYT forum was selling some custom bulkhead and shock tower braces so we decided to give them a try. MAN are these things sweet and they tie everything together so well, we doubt we could break this setup with a jackhammer.
Beat Your Truck Project B-Maxx - Custom Brushless E-Maxx

SHAFTS:  MIP Shiny CVD’s (part #: 1525) were selected to transfer the power from the diffs to the wheels and we used a set of Traxxas Steel CVD’s (part #: 5151R) down the middle.  The rubber boots on the Traxxas CVD’s are a nice touch and should help keep them running smooth for a long time.  We would love to see MIP and others go the rubber boot route as this will 
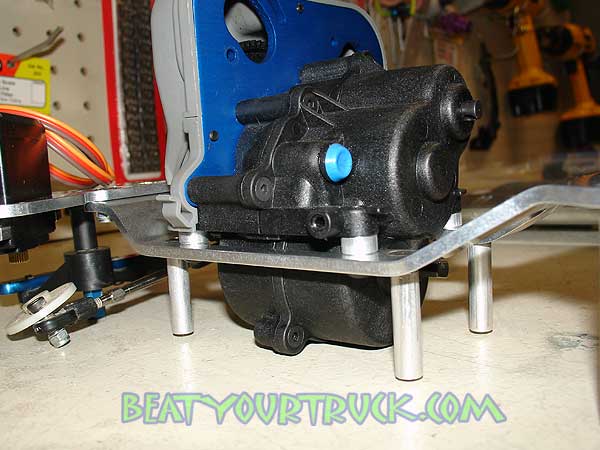
most certainly add life to the joints.  Keep the dust out!

Beat Your Truck Project B-Maxx - Custom Brushless E-Maxx

TRANSMISSION:  Thanks to Traxxas for coming out with the 3905 “Generation II” Emaxx with improved design and gearing inside the transmixxer, strong enough to handle brushless power.  There are some aftermarket gear upgrades for even this tranny but we though we would give the stocker a whirl first and see how it performs….and it has performed extremely well.  Note that the new 3905 transmission and the original transmission are not interchangeable.  The old style has 8 mounting screws and the new style has 4 larger screws.  The G4 chassis is setup for the new, 3905 transmission. 

WHEELS & TIRES:  Nothing overly fancy here.  A good deal was found on a new set of Emaxx wheels and Chevron style tires on good ol’ ebay.  We snagged them.  Our terrain has everything from mud, snow, water, sand, dirt and pavement.  The Chevron tread works nicely in all environments and should serve our project well. We also picked up some yellow dish wheels with step pins for some hard packed dirt runs.


   SOAKING UP THE BIG STUFF (ProLine PowerStroke shocks, RPM Axle Carriers, FlexTek suspension arms, Lunsford titanium hinge pins, FFRC shock towers)    


Without a doubt, some added “beef” would be required in the suspension department.  We’ll start at the top and work our way down.

SHOCK TOWERSFullForce RC has some killer Maxx towers, super thick and a bazillion mounting positions (OK...maybe 10 positions but that is a LOT).  Our experience with their products has always been a happy one and these shocks towers continue the tradition of excellence.  They fit perfectly to our GARC bulkheads and custom bulk braces. These towers took a major pounding (we spent more than the normal amount of time on the lid during this entire project) and they are still straight as can be, despite numerous snapped off body posts!
Beat Your Truck Project B-Maxx - Custom Brushless E-Maxx

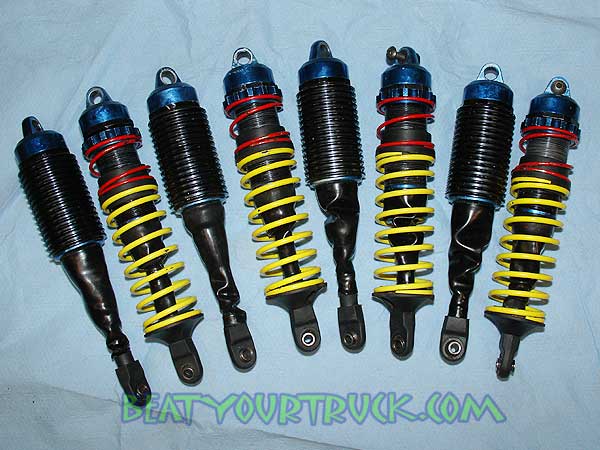
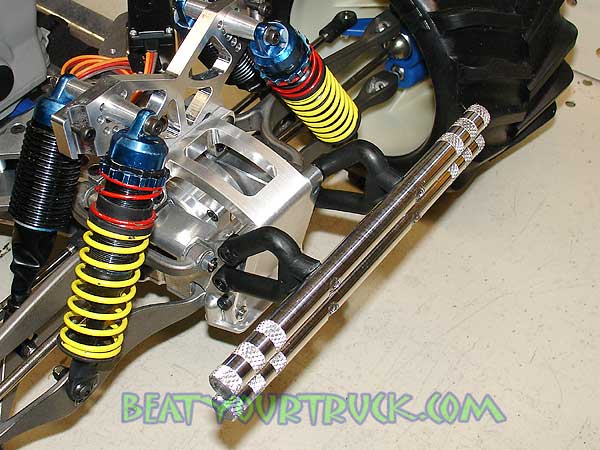
SHOCKS:  While the Pro-Line Power Strokes are no longer in production, you can still find these in good used condition or at some LHS’s here and there.  E-bay is probably your best bet and/or keep your eyes on the Buy/Sell/Trade area of the BYT Forum (where we found ours).  We chose these as we’ve run them before and they are truly our favorite Maxx shock.   They are ultra-plush and super reliable.

They are not your traditional shock set.  Included are four “traditional” coil-over shocks and four “bypass shocks”.  All eight shocks are machined from 6061 aircraft aluminum and anodized for a durable finish

The coil-over shocks have the following features:

  • Independent Primary and Secondary springs coupled with spring travel limiter achieves true dual-rate and provides a wide range of tuning options
  • Dual rate maintains a plush ride yet resistant to bottoming out
  • Threaded shock body for fine tuning the ride height
  • Oversized 15.75mm diameter body and 3.5mm shock

The by-pass shocks have the following features:

  • By-pass system contains 40% more fluid than conventional designs utilizing an innovative twin chamber by-pass sleeve with integrated cooling fins
  • Position sensitive dampening ports on the shock body increase the dampening rate as the shock compresses. This is achieved by reducing ports from 5 (3+2) to 2 (piston only) as the piston reaches the top of the stroke
  • Less susceptible to bottoming out on harder impacts but still maintains light dampening at extended travels
  • 15.75mm diameter shock bodies and 3.5mm shock shafts 

Beat Your Truck Project B-Maxx - Custom Brushless E-Maxx

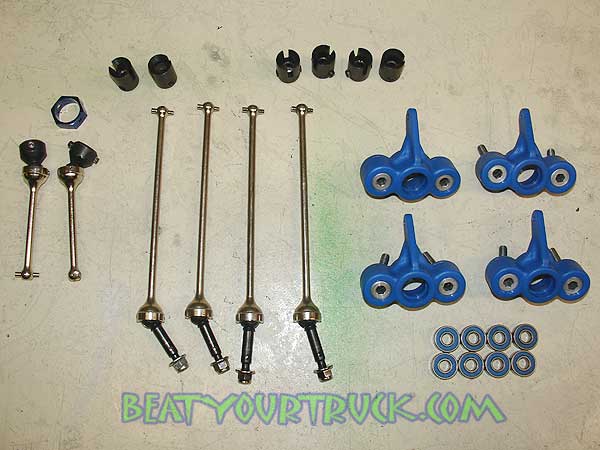
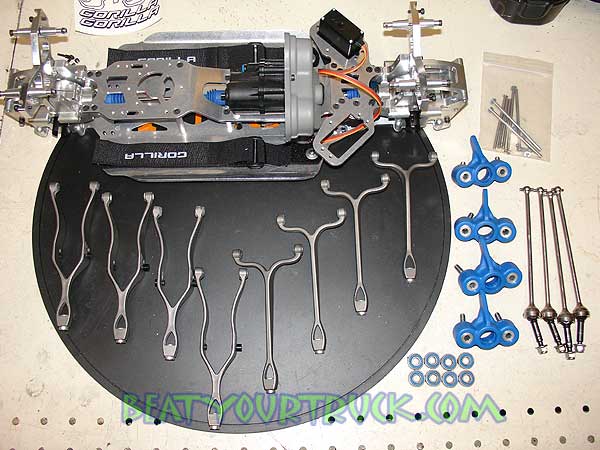
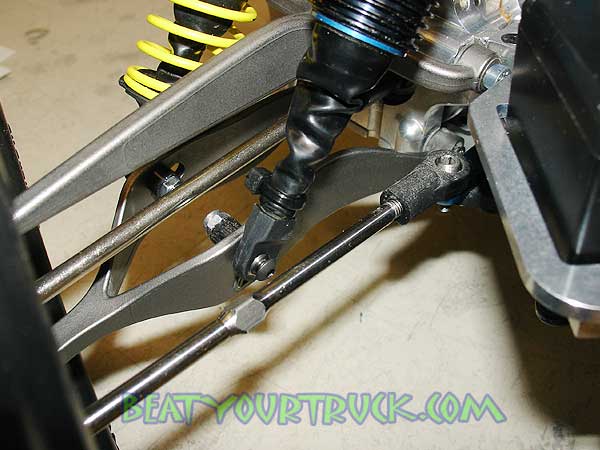
SUSPENSION ARMS:  There is simply one suspension arm set worthy of running on this truck, it had to be FlexTekFlexTek Titanium Suspension Arms are engineered to absorb large amounts of energy on impact without transmitting that energy back into the frame of your vehicle.  There is nothing else out there that comes close.  No need to get into too many details on these arms as we have already reviewed them about 4 years ago on another Maxx build we did.  Guess what?  These are the same arms!  We took them off our other Maxx truck for this project.  4+ years old and still ticking!  You can check out our original review on the FlexTek Maxx arms here.

We had one impact in particular with the left front wheel while the truck was clipping along at a decent rate of speed.  The impact involved a brick!  The arms flexed at impact, pulling the hinge pin through the front of the bulkhead, popping the rear e-clip off.  The arm then got semi-lodged in the steering mechanism.  Amazing!  We put the arm and pin back in place, replaced the e-clip and everything was as good as new!  You’ll see this impact in one of the videos.
Beat Your Truck Project B-Maxx - Custom Brushless E-Maxx

AXLE CARRIERS:  RPM Products hit a home run when they released the oversized axle carriers for the Maxx trucks.  Huge bearings and RPM plastic makes for a super tough carrier.  One of these bad boys on each corner of the truck delivered trouble-free operation despite numerous high-speed rollovers, cartwheels and fender-benders. 


   POINT ME IN THE RIGHT DIRECTION (Airtronics 94162 steering servo, ProLine Maxx steering saver, Lunsford turnbuckles)  

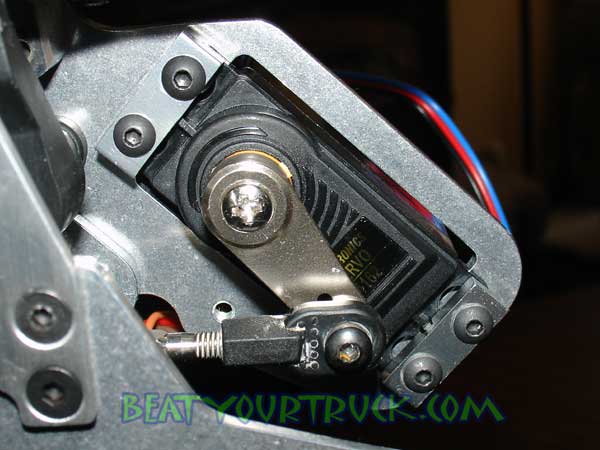
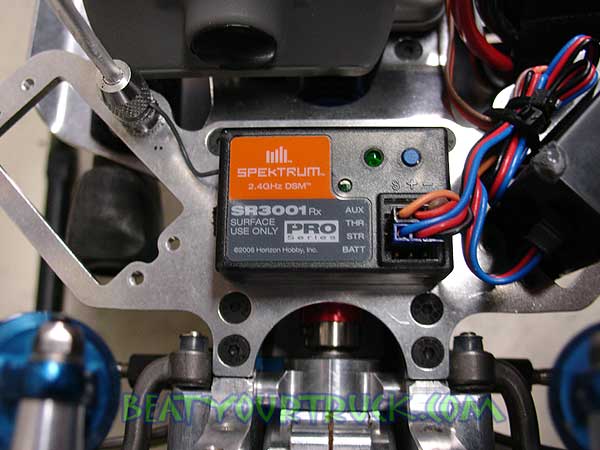
Going fast is only part of the equation right?  If you can’t steer your truck in the right direction, you might as well stay home and take up knitting. 

STEERING SERVO: We started off with a Tower Pro servo running on 7 volts via a Castle BEC. 
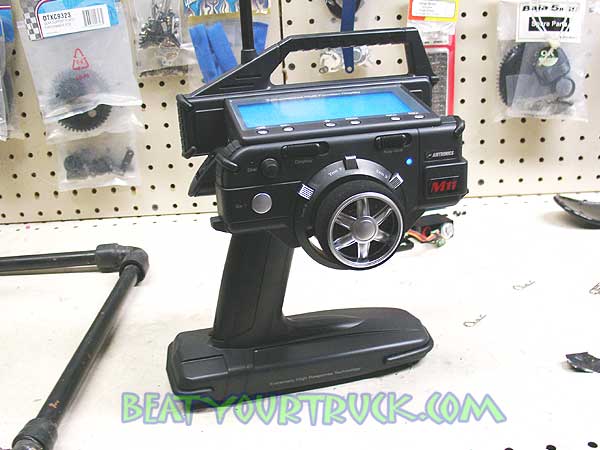
Sadly...the servo torched in 3 runs. So out with that! While shopping for a new transmitter, we noticed a nice deal on a Airtronics 94162 for $20! It delivers 154 oz/in of torque at 6.0 volts and has proven itself to be able to handle our truck with ease. In hind sight, at that price we should have done a dual setup but even with the single servo, it performs quite 
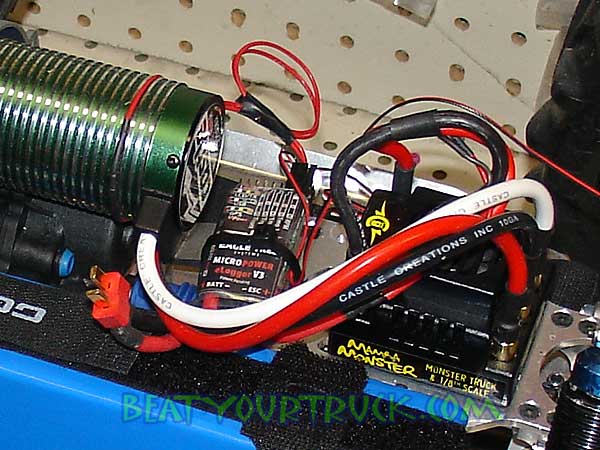
well. Note that some of the pictures throughout this project page show a Castle BEC being used. These pictures were taken early on when we were running separate 7-volt power to the Tower Pro servo. The BEC was not used in the final project setup.
Beat Your Truck Project B-Maxx - Custom Brushless E-Maxx

The GorillaMaxx G4 chassis gives us two spots to mount a steering servo as it is designed to upgrade a new style E-Maxx which uses dual servos. We're sticking with one. We did add an aluminum servo horn for strength and zero deflection.

To kick it up a notch and protect our servo case, we installed a couple of FullForce RC's killer aluminum servo mounts. These simple pieces add SO MUCH to the mounting strength of a servo. With these in place, it will be virtually impossible to break a servo case mounting tab. We add them to all of our project trucks and we have yet to break a mounting tab! $12 will get you enough mounts and hardware for three servos! These are a super bargain and are way too often overlooked by bashers and racers alike. They are so simple and effective, they are a bargain at twice the price! Note: FFRC also has these for 1/5 scale servos as well.

Beat Your Truck Project B-Maxx - Custom Brushless E-Maxx

STEERING SERVO SAVER: You can always go with an old reliable system like a heavy duty Kimbrough servo saver, it's one of our favorites. However we had in our possession a Pro-Line Maxx Performance Steering Kit and chose to add that to out B-Maxx. You can read a short review of the ProLine System here. I am pretty sure these have been discontinued however I bet you can still find some on e-bay or other hobby shops. It is a great system and features a nice protective break-away to protect the servo which is adjustable to keep big servos from overpowering the saver. The tension on the breakaway is adjustable. It also has bearings in the pivot shafts to keep things turning smoothly. With this servo saver and the FFRC servo tabs in place, our steering servo can sigh a breath of relief...it should be alive and kicking for a long time!

Beat Your Truck Project B-Maxx - Custom Brushless E-Maxx

TURNBUCKLES: The obvious choice here is Lunsford. BYT uses Lunsford on every truck we own. Why? The quality, durability and performance are unmatched. Sure, they cost a little more than some other options out there but knowing that your chances of a turnbuckle failure are slim to none makes them worth every penny. Hey, if you actually manage to break something that Lunsford makes, give yourself a pat on the back. You are a SERIOUS basher (and perhaps a really bad driver).
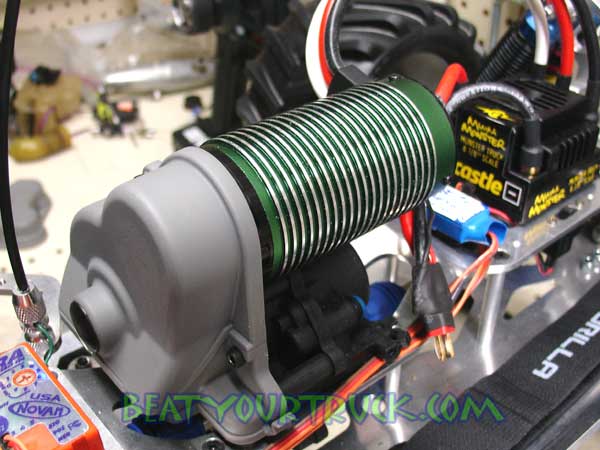
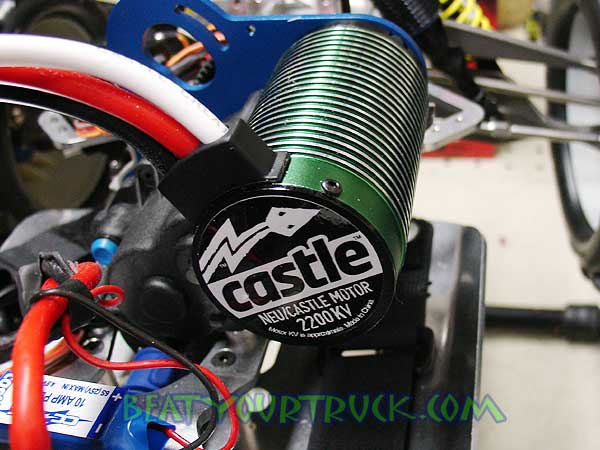
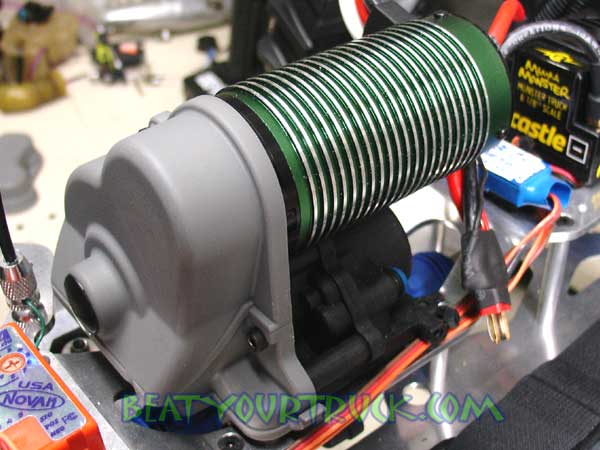
Beat Your Truck Project B-Maxx - Custom Brushless E-Maxx


   POWER TO THE PEOPLE (Castle Monster Combo 2200kv, Zippy RC 5000mah 5S lipo pack, Deans plugs and wires, Castle 6mm bullet plugs, Traxxas single motor mount and gear cover)  

MOTOR:  One word......nuclear.  Simply…….nuclear.  There is no other way to describe this thing.   The 2200kv, 4-pole Monster motor from Castle is powerful beyond comprehension. Talk about a Hemi powered go-cart! You should need a special license to run something like this. It propels the B-Maxx like the little Mamba's propel 1/18th scale Losi Mini-T's.

MambaMonster logoWe LOVE the flat spot on the 5mm shaft!  Thank you for finally giving us something for our pinion gear to hang onto! We can only guess that with this much power, Castle was forced to go with a flat spot on the shaft just to keep the pinion secure. The motor can is ULTRA-TRICK with built-in cooling fins, it’s nothing but A++ quality.  Now let’s talk about the sound.  There is something wicked about the whine this truck puts out.  It's the gears, tires and drivetrain you hear the most but the sound is still addictive. You hear this thing coming and turn your head instantly!  It screams pure speed and power.  What a sweet symphony it is!  Even at low speeds, the motor is super smooth….smooth enough to crawl with. 
Beat Your Truck Project B-Maxx - Custom Brushless E-Maxx

ELECTRONIC SPEED CONTROL:  The Castle V3 Monster ESC is truly a tower of power. It features massive 6.5 mm gold plated female bullet plugs and a high efficiency heat sink with a built-in fan that will automatically turn on at 150F. Of course it is Castle Link compatible and we were able to program our Monster ESC exactly how we wanted it and fine tune it as we learned how powerful the motor/ESC/battery combo was. Being able to adjust the punch control and throttle curves is a huge benefit when running big power rigs like this. You can really make a somewhat overpowered system more drivable 
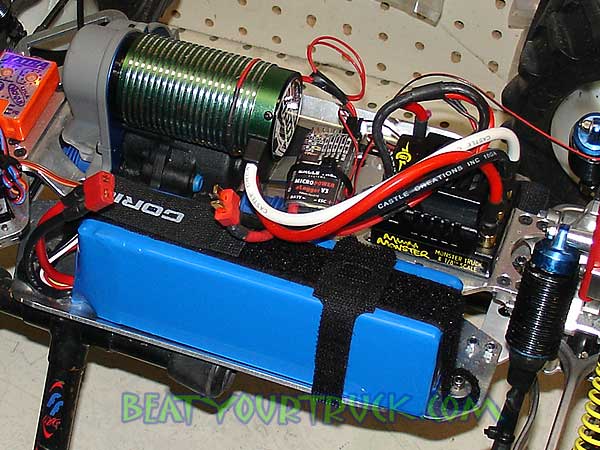
with some simple tweaks to the ESC setup.

MambaMonster logoThe Castle Monster Combo comes with the ESC, motor, 18T 32P aluminum pinion (anodized green...very cool), and Drivers Ed user guide. You'll need connectors and some soldering ability to get everything ready to go. Chances are if you are getting this serious about a brushless system, you know how to solder. If not, check out this helpful video by one of our moderators (Sleebus.Jones) or at worst, have your local hobby shop or electronics store solder them up for you.

Castle offers two motor choices for the Monster Combo. The 2650kx setup is best for 1/8 scale buggies. The 2200kv setup is best for monster trucks like the E-Maxx.

From the Castle web site: Based on Steve Neu’s awesome 15 series motor, the Neu-Castle 2200 and 2650 are works of mechanical art. They both feature high quality oversized bearings, sintered Neodymium magnets, superior electromagnetic design, and rigorous engineering control in our own factory resulting in a Monster motor we can put our name on. Neu-Castle 2650 KV – Intended for 4S (16.8 Volt) operation. Ideal for 1/8th buggy conversions. The 2650 is 68mm long. Neu-Castle 2200 KV – Intended for up to 6S (25.2 Volt) operation. Incredible in monster trucks with up to 6S lipo packs (4s lipo is the sweet spot), and works great in 1/8 Truggies as well. The 2200 is 75mm long making it capable of handling more power than the 2650. This one is the bad boy!

Yes Castle.....it is one bad boy motor! Motor efficiency is pretty impressive with the Monster series at a posted 85%+. That means less battery power is wasted and more is put to the wheels. It also means more run time compared to less efficient motors.

Check out the product review on the Castle Monster Combo system for more info!

BATTERY POWER: We went out on a limb and tried a new battery manufacturer this go around. There was a lot of buzz on the BYT Forum about Zippy packs so we decided to give them a try. We picked up our Zippy 5000mah 5S1P (20-30C) Li poly pack from HobbyCity.com (about $105 + shipping) . Our recommendation here is to use the upgraded shipping. It would be worth it. We chose the slow shipping method to save some bucks (bad move) and it took like 3 weeks for the pack
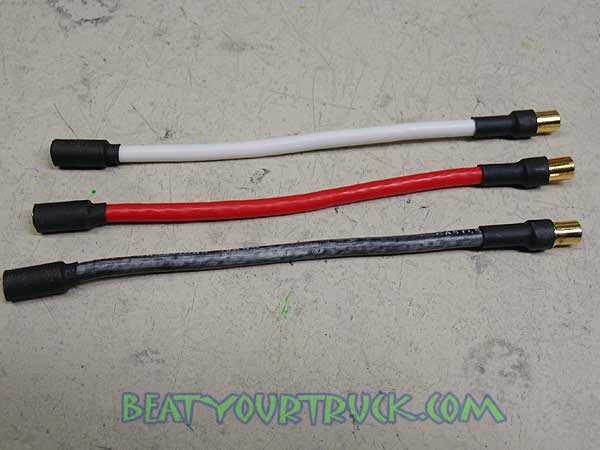
 to arrive. Too slow! :)

Zippy 5000mah 5S1P Li poly pack specs:
Capacity: 5000mAh
Voltage: 5S/18.5v/5 cell
Discharge: 20C ~ 30C
Weight: 659g
Size: 160 x 51 x 40mm
Connectors: JST-XH for balance/charge and Deans (wanna be) for output.

Note that the plug they call out as "Deans" is a knock off plug and not as nice as the Deans. It works with other "real" Deans plugs but the quality is not there. You'll want to replace this right away with a genuine Deans plug.

The pack is pretty impressive for the money and 10-15 minutes of run time per pack was common. Our gearing setup kept it running cool and it never really got much over 100 degrees F, even after seriously hard and fast runs. You'll see some performance graphs of a few runs below.....read on!
Beat Your Truck Project B-Maxx - Custom Brushless E-Maxx

PLUGS, WIRES and CONNECTORS: We used Deans Ultra Plugs (our favorite plugs) , Deans 12 ga Ultra Wire and Deans Racing Solder throughout. The Ultra Wire 12 Gauge silicone wire features 660 strands of pure copper. On the motor and ESC hookups, we used the Deans wire and 6.5mm bullet plugs from Castle. Some shrink wrap to seal things up and we had a trick, heavy duty set of juice carrying cables! We picked up all of our bullets from Holmes Hobbies, great prices and fast shipping.

Beat Your Truck Project B-Maxx - Custom Brushless E-Maxx

GEARING: Castle offers some additional pinion options separately and they should fit most
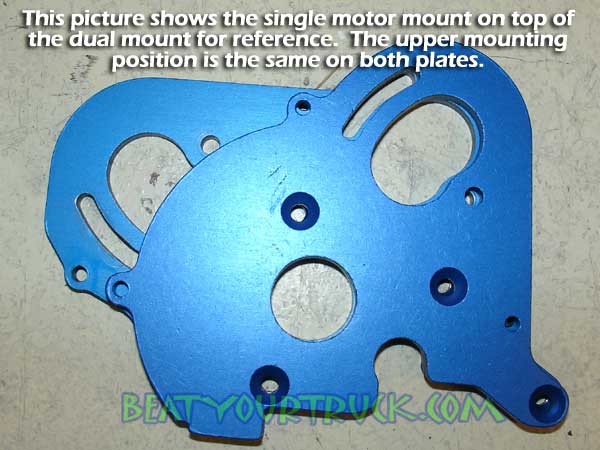
 peoples requirements.

#1 - CC PINION - MOD:
manufactured from titanium coated hardened steel. Most common use will be for the 1/8th scale conversions. Available in 11T, 13T, 15T, 17T, 19T, 21T, and 23T.

#2 - CC PINION - 32P: machined from aluminum and anodized Castle green. Most common uses will be for monster trucks. Available in 18T, 20T, 22T, 24T, 26T, and 28T.

Our final project gearing: 19/68

This gear combo gave us the mesh we needed between the pinion and spur gear. There are some gear combinations that we could not make work! With the stock dual motor mounting plate (note that stock dual and optional single mounting plate provide the same motor placement on the left/top mount).

Things to note before ordering gears!

  • 19/62 motor hits transmission case
  • 19/65 – right side no go / left side very close but not enough mesh
  • 19/68 – right side fits with good mesh / left side fits but with very little space between motor and transmission


    The stock 3905 E-Maxx uses .8 Mod (Module) gear pitch so we picked up a Robinson Racing Products 19T steel pinion for the job. They are about $8 and built tough like all RRP stuff. For spur gears, we used stock Traxxas plastic gears. Our slipper was kept pretty tight. If it was left loose at all, the power from the motor would whip it into a frenzy! Be sure to check out the spur gears you are running to determine if it is .8 Mod or 32P. Normally, it is printed/molded onto the face of the spur. We suggest this as over time, some gear can get replaced with non-stock setups and trust us, if your gear pitch or mesh is off with a motor like this, you might as well toss them in a food processor (not recommended by the way) because they will be shredded FAST!

    This gearing setup lets you pull wheelies when you want to and also keep things under control when needed. We felt it was pretty fast and by some rough calculations, it should be in the 35+MPH range. Overall the low end punch and top end speed seemed to be nicely balanced for general purpose bashing and some fun speed runs.
    Beat Your Truck Project B-Maxx - Custom Brushless E-Maxx

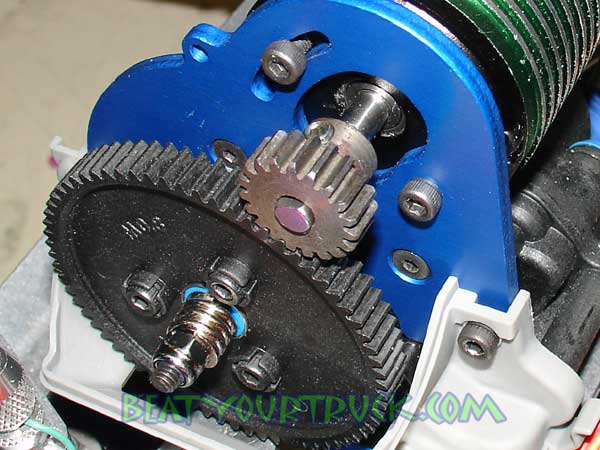
    SINGLE MOTOR MOUNT & SPUR
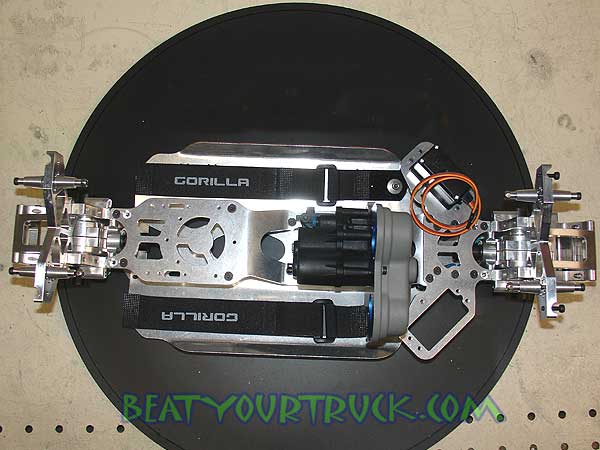
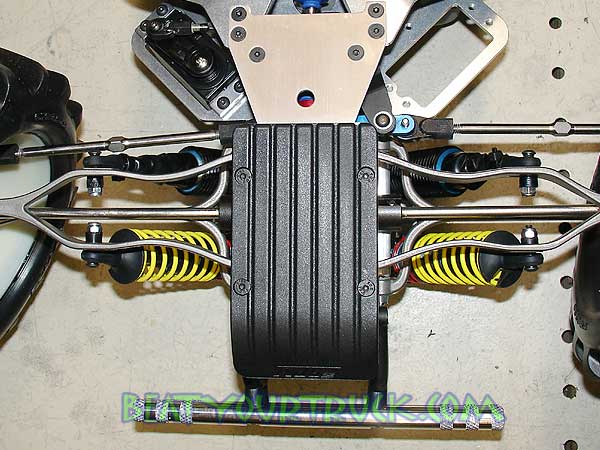
 COVER:  For a better looking setup and for more room on the chassis, we opted for the Traxxas single motor mount (part number: 3997X) and spur gear cover (part number: 3977X). Initially this was not going to be added to the truck but once it was installed, it made everything look so much better and more professional. It looks "factory" baby! And it will do a much better job of keeping dirt and junk out of our gears. It also moves the motor towards the center of the truck (better balance) and makes room for big batteries on both sides of the chassis. The single motor mount plate and cover were about $13 total at Tower Hobbies...money very well spent.
    Beat Your Truck Project B-Maxx - Custom Brushless E-Maxx
    Beat Your Truck Project B-Maxx - Custom Brushless E-Maxx

  •    MISCELLANEOUS GOODIES   

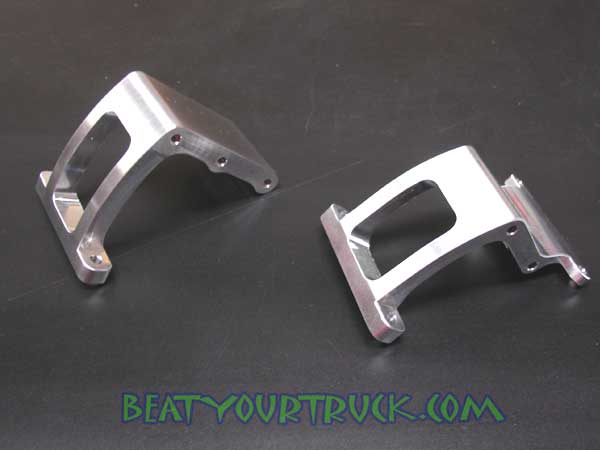
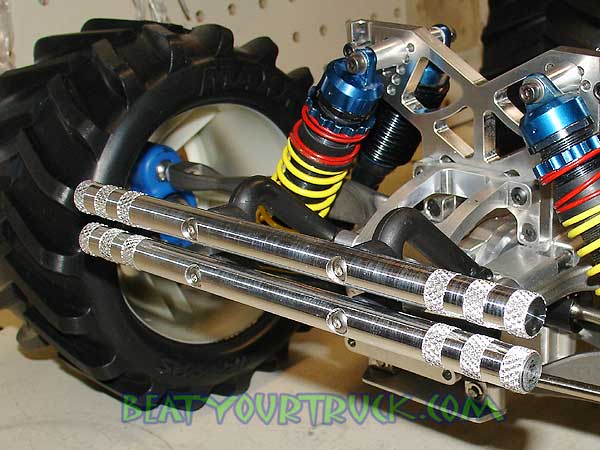
    FFRC Aluminum Bumpers:  We added a set of FullForce RC aluminum bumpers to our rig, front and back. We like using aluminum bumpers in conjunction with the stock plastic mounts. The stock mounts still provide some cushion and the bumpers themselves can take a major league beating with minimal wear and tear. On our 8th or 9th pack, during a high speed pavement run, the truck got out of hand and we experienced a full speed cartwheel convulsion. It seemed to roll, flip and spin for minutes, even though it was just a few seconds. During this acrobatic display, we were waiting for parts to come flying off in every direction (it was pretty ugly) but alas, the only damage incurred was a small bend to one of the bumper tubes. The bumpers did an awesome job of protecting the truck during this feat (and the numerous other impacts we had) and were virtually unscathed by the event. These are some tough bumpers. Not to mention they look SWEET! The knurling on the ends is a nice detail.
    Beat Your Truck Project B-Maxx - Custom Brushless E-Maxx
    Beat Your Truck Project B-Maxx - Custom Brushless E-Maxx

    RPM front skid plate cover: To help protect the front skid/nose of the truck, we tossed on a RPM front skid protector. It should help the truck slide over some rough stuff rather than pounding on the chassis. We have our truck slung pretty low to keep the center of gravity down, especially important to help high speed handling. This skid protector got a workout, the fit was good and it performed its job well.
    Beat Your Truck Project B-Maxx - Custom Brushless E-Maxx

    Airtronics M11 transmitter with Spektrum module and Spektrum Receiver: This upgrade was not part of our original plans but HobbyPeople.net was having a smoking sale on M11’s ($150) and we couldn’t say no! Ebay provided a brand new Speky transmitter module and receiver for $100. So for $250, we were able to upgrade our radio system to a Speky M11. Sadly, after about 4 packs of run time, our M11 died (went totally dead) and required that it go back to the service center in California. The good news is that Airtronics had the unit repaired and back to my door in about 1 week. That is some pretty awesome service!
    Beat Your Truck Project B-Maxx - Custom Brushless E-Maxx
    Beat Your Truck Project B-Maxx - Custom Brushless E-Maxx


       REMOVING THE GUESS WORK (Eagle Tree V3 Data Logger System)  

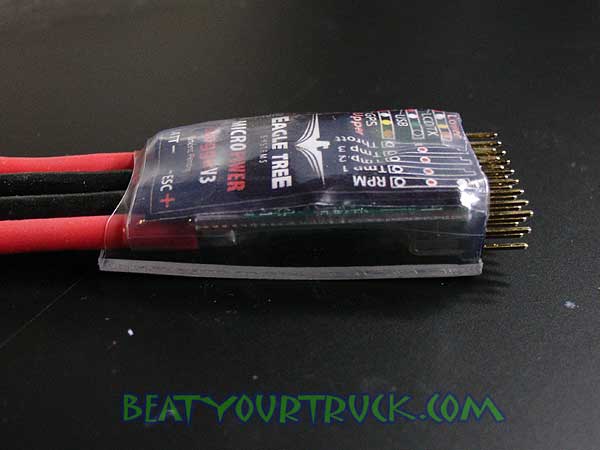
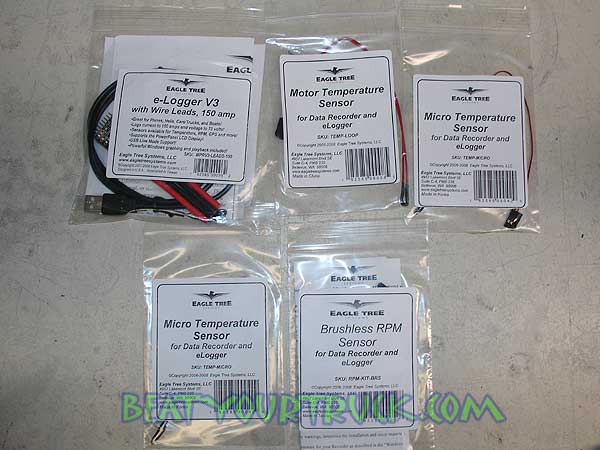
    We can all guess at speed, motor RPM, motor and battery temperatures etc but unless you can accurately capture that data for review, it is nothing more than a guess.  Eagle Tree has what we feel is the ultimate system for gathering that data and much more.  The Eagle Tree system gathers data from various sensors while you are driving your truck (or car, plane…whatever) and stores it for download. 
    Beat Your Truck Project B-Maxx - Custom Brushless E-Maxx
    When you get your rig back to your shop, plug it into your PC via a USB cable and download the data to the Eagle Tree software.  Unlike some other telemetry systems out there that just show you live data and peaks, the Eagle Tree system lets you play it back in real time, slow, fast, check peaks, graph the data and more.  It is simply amazing!  You can also set the data capture intervals.

    Mounting electrical items without cases can be tough. We shrink wrapped a piece of lexan to the bottom of our V3 to give us a flat, solid surface to attach it to almost any surface. It should also protect the V3 as well. We added the following sensors to our V3: motor temp sensor, micro temp sensor (for battery pack), brushless motor RPM sensor, and another spare micro temp sensor we could add to our ESC or another battery some day in the future.
    Beat Your Truck Project B-Maxx - Custom Brushless E-Maxx
    Beat Your Truck Project B-Maxx - Custom Brushless E-Maxx


       TIME FOR A BEAT RUN   

    Zippidy-do-da! When the Monster ESC chirps out 5 beeps (indicating it has a 5S pack in the system), it is really hard not to smile like a lotto winner in anticipation of what is to come. When you pull the trigger, prepare for an even bigger grin. One that will make your mouth stretch and your face hurt. This truck launches and launches hard. The low center of gravity, stability, and responsive handling combined with the smooth, seeming endless power of the Castle Monster System will make even a staunch nitro head think twice about all the time he or she spends tuning their smoke machine.

    Just feather the trigger and the front end is off the ground. In fact, we softened up the throttle curve just to make it easier to drive. Driving this truck reminds me of driving the BYT Project Rocketship.....just bigger and easier to drive, but equally insane.

    Our first run was crazy and it was impossible to even keep the truck on the road. Something was wrong. Ah ha! Somebody (me) forgot to set the toe-in on the front tires. After a quick adjustment, the truck became much easier to drive and it actually went where we pointed it. The truck is fast! It seems to be right at the edge of going too fast…so fast but not too fast! The Chevron tread tires, motor and drive train noise is a beautiful symphony when this thing is flying down the road. The best speed reading via our Hot Wheels radar gun was 36mph. That seems to jive with the initial calculations we did when picking out the motor, gears, battery etc. With the low operating temps we have via the current setup, we could easily increase the pinion size for more speed but really, it seems to be right in the sweet spot as is.
    Beat Your Truck Project B-Maxx - Custom Brushless E-Maxx
    Beat Your Truck Project B-Maxx - Custom Brushless E-Maxx
    Beat Your Truck Project B-Maxx - Custom Brushless E-Maxx

    TIME FOR SOME PERFORMANCE GRAPHS : The Eagle Tree V3 data logging system is a killer option. Here are some graphs we pulled showing amp, voltage and watt use. It also shows motor and battery temps. Pretty SWEET!

    Here's a sample of the dashboard screen that lets you play back your recorded run and watch the gauges go wild! You can pause, slow or play at real speed.

    TmpA (Temperature Sensor A) = Castle Monster Motor
    TmpB (Temperature Sensor B) = Zippy battery pack

    Beat Your Truck Project B-Maxx - Custom Brushless E-Maxx

    With the click of the mouse, you can also put your data into a 2D graph. It is fully customizable with colors and what data is showing etc. Absolutely awesome software. Eagle Tree is simply amazing.

    BYT Eagle Tree Graph
    BYT Eagle Tree Graph

    TmpA (Temperature Sensor A) = Castle Monster Motor
    TmpB (Temperature Sensor B) = Zippy battery pack


       ANY PROBLEMS?   

    Wheel nuts: Yes sir, these suckers like to fly off randomly and at the worst possible times! When it happens (and it will), make sure you have extra hexes and hex pins on hand because they will get launched into outer space. It was bad enough chasing a 40MPH tire bouncing down the street! We used brand new elastic locking wheel nuts but they still came loose. Some (blue) medium strength threadlocker seemed to help a little (a small drop of CA glue might also help), but the simple fact is that we had to tighten these up after every single battery pack. Be prepared!

    Beat Your Truck Project B-Maxx - Custom Brushless E-Maxx

    Rear Differential Spider Gears: BUSTED! Oh yeah baby. So far we have only torched one set of spider gears in the rear diff. Truth be told, the original set never spun completely to our liking. They felt a little "off" and never spun super smooth. Our replacement set however spins like a dream and knock on wood, these have already lasted more than 4 packs (the life of the first set).

    Other than our exploding spider gears, difficulties in keeping the wheels on the truck and our fried Airtronics M11, our project truck has performed flawlessly. We don’t count things like broken body mounts as that is a result of our driving skills, not a flaw with the truck. At the time of this write-up, we have about 15 packs of run time through it and it gets more fun to drive every time the Mamba chirps 5 times!


       OVERALL PERFORMANCE   

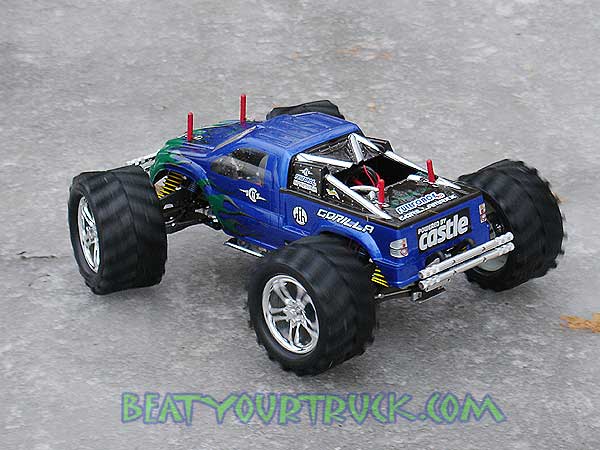
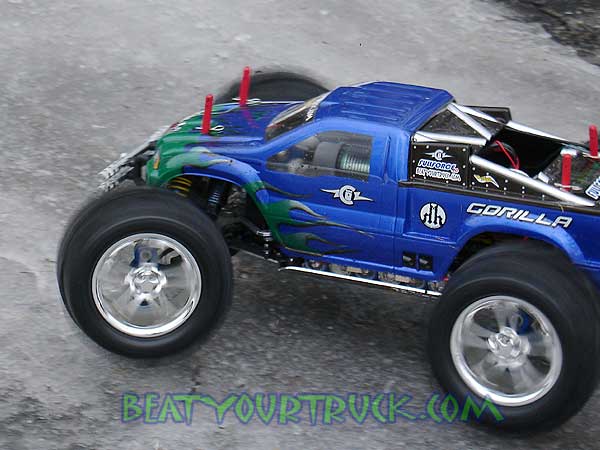
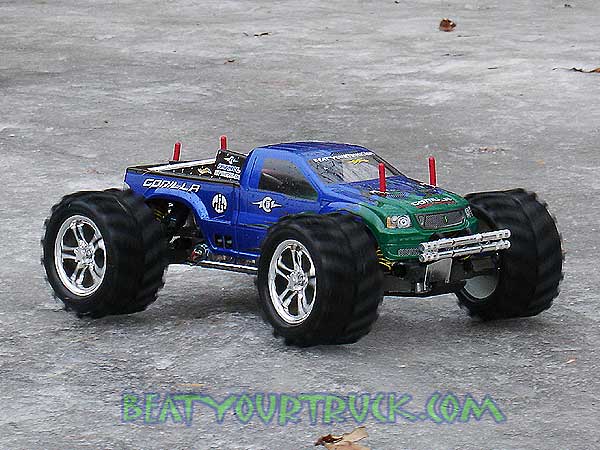
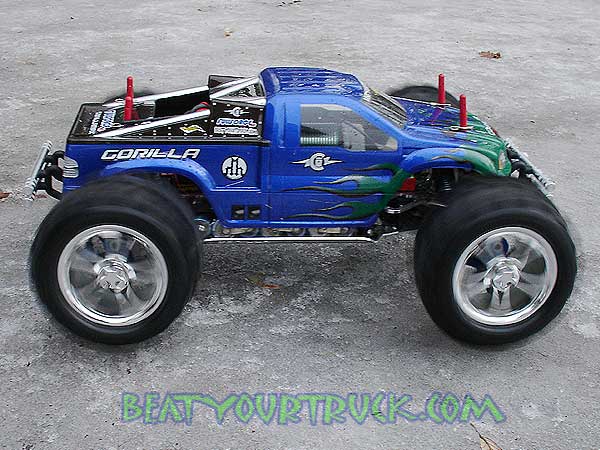
    The low stance of the truck combined with the ProLine shocks keeps it exceptionally well planted on curves. When the truck found itself on its lid, it was normally caused by an overexcited trigger finger. The chassis and suspension setup is simply awesome and this is by far the most stable and predictable Maxx series truck we have ever owned and beat. It drives more like a REVO than a Maxx. The pictures clearly show the stance is low and aggressive. Even with it being slung low, we had zero problems with ground clearance and the truck handled anything a standard Maxx could do, and then some. If the ground is loose or wet on the slightest, it is easy to get some 4 wheel drifting going with this rig, even with the Chevron tires.

    The Mamba Monster Combo with the Zippy 5S pack is a great marriage. Even while running this thing hard, our battery and motor temps were always well under 150 F and we have yet to hear the Mamba ESC fan turn on. Run times are OK at 10-15 minutes but it is tempting to add another 5S, 5000mah pack in parallel to boost the system to 10,000mah (or getting another 5S, 5000mah pack to swap in when the first one dies). Getting 20-30 minutes of run time would be super nice addition.

    After the first set of differential spiders gears was replaced, there have been no further incidents. Other than that one failure, the drivetrain has been very smooth and solid.

    The truck drives extremely well and with instant nitrous like power on hand at all times, it is a treat to drive on the street, dirt, grass or basically anywhere. The electric truck convenience of just flipping on a switch and piloting a missile is also a big plus. When bashing time is limited, we’ll reach for this truck rather than spending time starting and tuning a nitro engine.


    Beat Your Truck Project B-Maxx - Custom Brushless E-Maxx

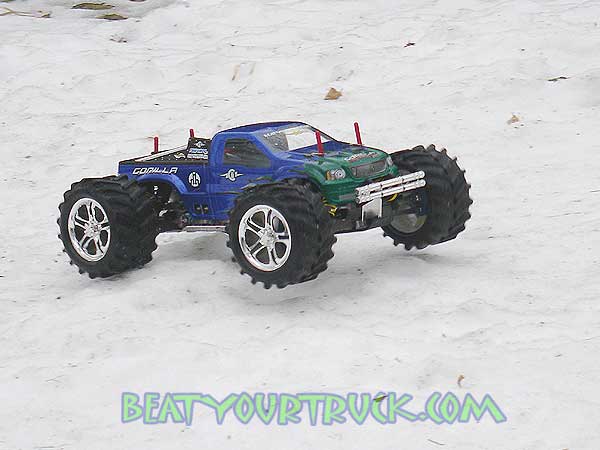
    Here's one quick video we did of the first few runs on the truck. It was getting a fairly light beating on the first few runs just to make sure things like gears were meshed right, all the hardware was in place etc. The first few runs of any project give ideas on the reliability, performance and handling of the truck. Nothing overly exciting but it gives you a taste of what this thing can do. We'll be adding more footage now that Spring/Summer is finally here so stay tuned!


       CONCLUSION   

    All in all, we are extremely pleased with all aspects of this project truck. Minus the transmission, most of the truck was upgraded with pieces that performed and lasted better than the stock items. The dramatic change the G4 chassis delivered really give this truck a unique look and feel when driving on the ground, or flying through the air. Winner winner chicken dinner on the combination of the FullForce RC shock towers, FlexTek arms and Pro-Line shocks. What a nice setup. The truck rides plush and soaks up bumps like a Shamwow soaks up soda out of carpet.

    Of course without the gobs of power given by the Castle Monster Combo, the truck would look good and be durable, but it would be a bore to drive. This unit is anything but a bore. The Zippy pack performed well and we'll be trying some other packs in the same spec range so we can compare performance via the Eagle Tree system. Talking about Eagle Tree....if you have ever thought about getting one. Stop now and just do it. You will not be disappointed!

    It's hard not to smile in awe when you see this truck sitting on the bench. It almost seems to be looking back at you whispering, "Let's go bash". We hate to disappoint. Let's go bash!


    Castle LOGOThis project would be blah without the rocket-like power from the Castle 2200kv Monster Combo. Castle just keeps coming out with more and more top-notch brushless systems and now, they have one for almost any sized car or truck on the market. Not only are their products at the top of the heap, their service can not be beat. From technical questions & assistance to repairs, nobody beats Castle. It's why Castle is chosen again and again by BYT to handle our brushless needs!


    GorillaMaxx LOGOThe GorillaMaxx G4 Race Chassis is simply awesome. GM has taken the Maxx platform to a whole new level with a wide variety of chassis systems. The G4 lives up to its name as a Race Chassis with its incredible stance, balance and stability. The quality is excellent and quite frankly, you would be crazy to use something other than GorillaMaxx for a E-maxx chassis upgrade.


    ffrc LOGOFullForce RC comes through yet again with some killer shock towers and bumpers for the Maxx. We also used their 12.9 black oxide screw kit on our entire truck as we have found their hardware to be the best out there. We simply can not seem to build a Project truck without finding at least one or two sweet items from FFRC to add to the mix.


       SPECIAL THANKS   

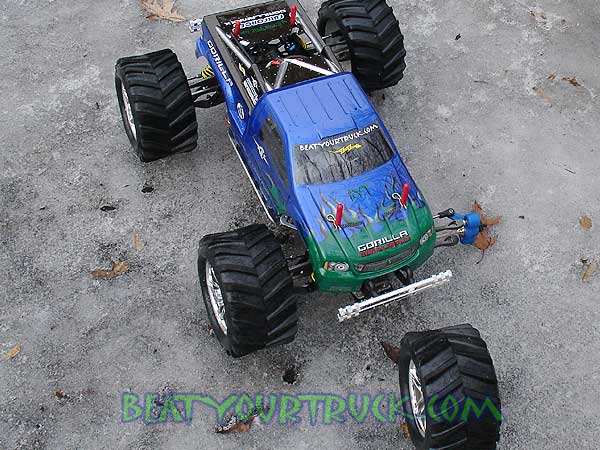
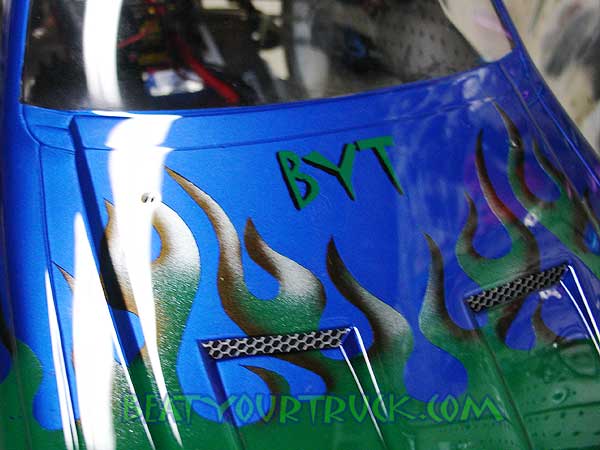
    A special thanks goes out to jholthus, a BYT Forum member and Supporter. Jholthus painted up the project body and donated it to BYT. He calls himself a beginner painter but we beg to differ. The shell is killer and the painter is an outstanding guy. We owe you one buddy!
    Beat Your Truck Project B-Maxx - Custom Brushless E-Maxx


    © Copyright 2001-2006  Beat Your Truck.   Site best viewed at 800x600 or higher with Internet Explorer 5.5 or higher.
    Advertise with Beat Your Truck     *     Donate to Beat Your Truck