| |
| As you may already know, this project has taken the longest to complete of any we have ever done. Why? Is it terribly complex? No. Was it incredibly expensive? Not really. The never ending project took forever as we have been battling differential troubles. Numerous combinations of “better” parts were tried and we spent WAY too much money on differential upgrades that did not work. 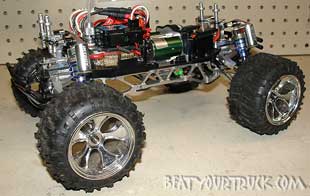 Now, let’s be totally reasonable here. While the MLST is well known for having less than adequate differentials, a big part of our problem was that we were trying to run a dual Mamba setup on this truck. Silly? Stupid? Absolutely. However this is Beat Your Truck and a dual brushless upgrade is exactly what we are all about! While this has been the project has taken longer than any other to
finally be released, it is also the most special. The BYT MLST truck
was purchased by BYT forum members and given to BYT as a gift; a “thank
you” for the things that BYT does for them and others.
|
 When
the MLST first arrived, it was pretty much a brand new truck on the
market and there were very few hop-ups on the market. The elongated
time frame of this project did have one benefit; it allowed the market
to come out with new bells and whistles we were able to add to our
truck.
When
the MLST first arrived, it was pretty much a brand new truck on the
market and there were very few hop-ups on the market. The elongated
time frame of this project did have one benefit; it allowed the market
to come out with new bells and whistles we were able to add to our
truck.
| |
 While
we were taking the time to totally teardown and rebuild the MLST into
a better basher, we thought it would be the perfect time to lose the stock
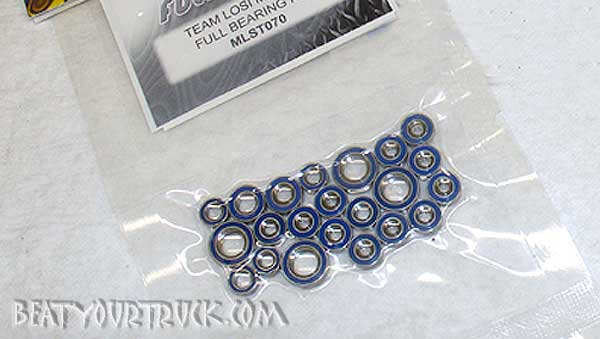
metal shielded stock units that Losi included with the RTR truck. While
we were taking the time to totally teardown and rebuild the MLST into
a better basher, we thought it would be the perfect time to lose the stock
metal shielded stock units that Losi included with the RTR truck. FullForceRC has a nice rubber sealed bearing set (part number: MLST070) which includes ALL 22 bearings on the truck…even inside the center, front and rear differential housings! The entire kit costs a mere $20. Nice! We installed these while we had various areas of the truck torn apart, doing other upgrades. They are smooth as silk and will reduce power sucking drag in our drive train. The rubber seals do a better job of keeping out the elements than a standard metal shielded bearing and that means longer life and better performance throughout their life. 
|
| |
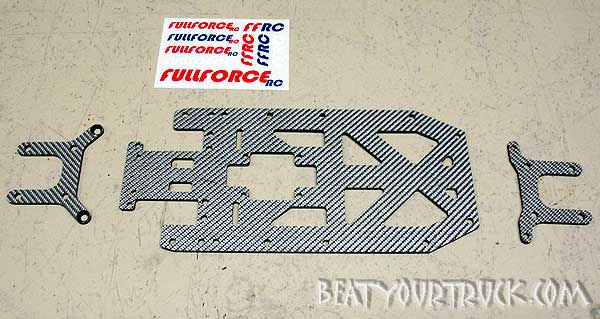
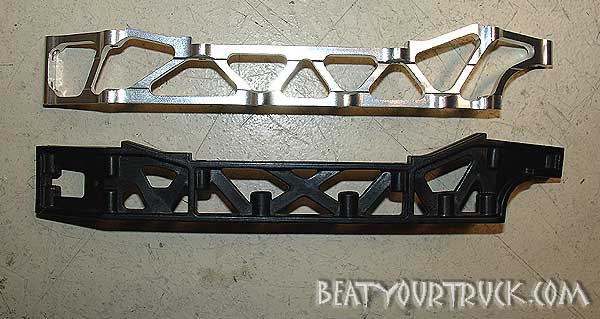
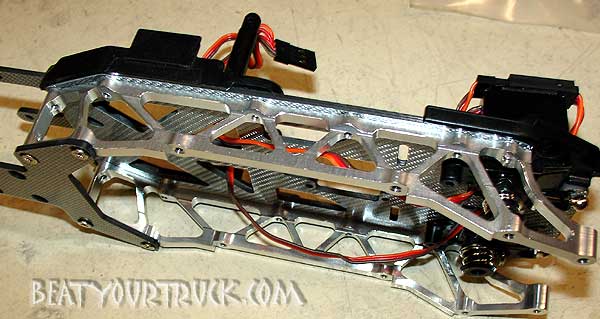
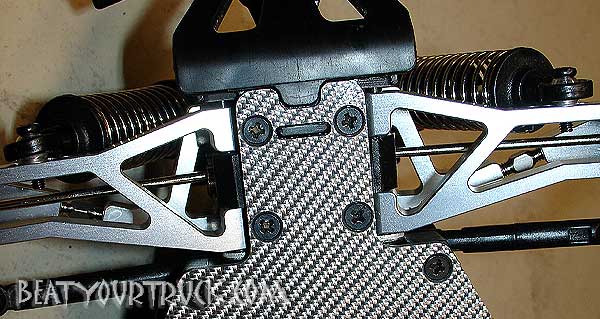
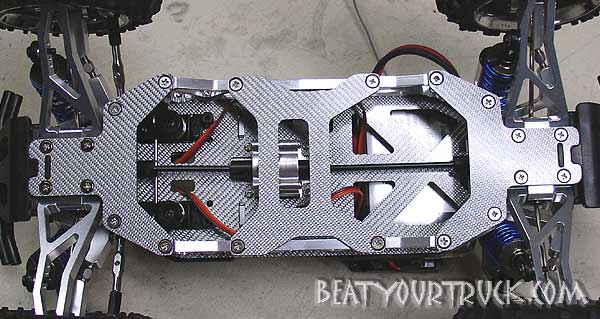
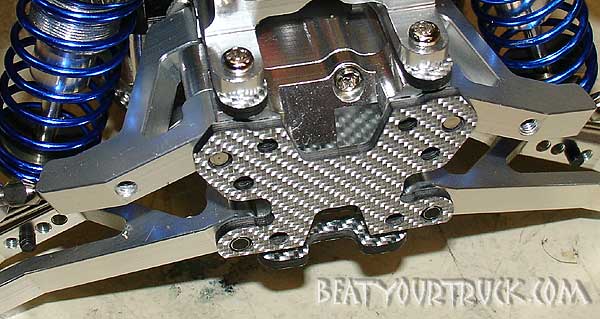
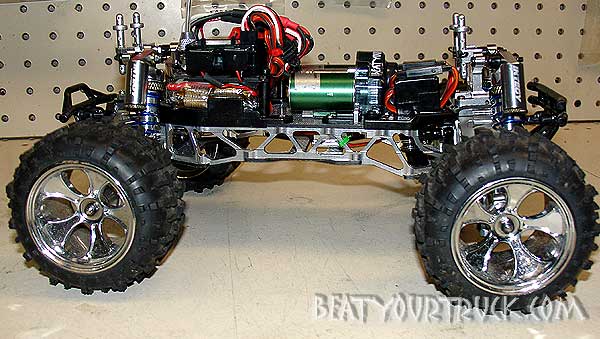
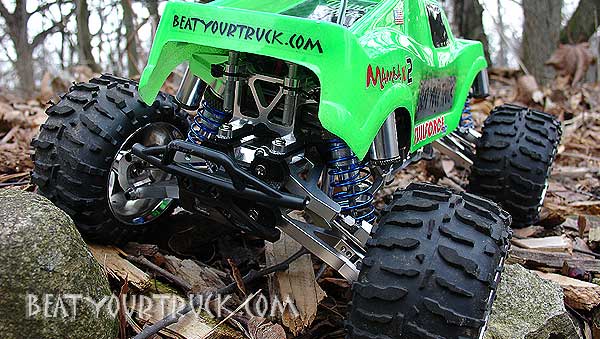
| The
MLST double-decker chassis is just like its big brothers in design. We
love this concept and think it is one of the coolest setups for toughness
in the RC world today. Even with the killer design, we wanted to trick
it out a little! FullForceRC
offers a carbon fiber main chassis set (part number: MLST003) that was
way too cool to resist. Normally, we steer clear of carbon fiber for bashing
however with the double-deck design of the MLST chassis and the numerous
mounting points and double-decker setup, we felt confident that this is
the perfect place for some fiber action.
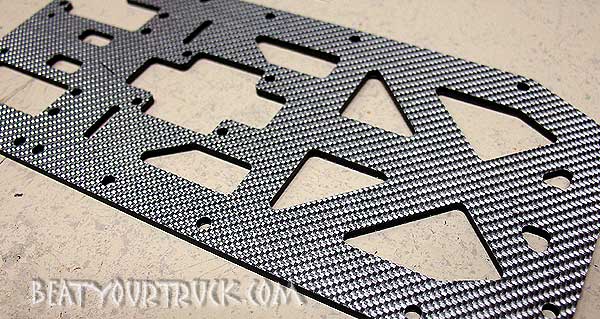
The carbon fiber plates are the exact thickness of the stockers, making
the stock hardware usable (however as you will read on the next paragraph,
we installed some other chassis goodies that came with specific hardware).
The edges, holes and counter-sunk areas of the CF plates are perfect.
We sealed the edges of all our CF with a light coat of thin CA glue
before taking it out for a thrashing. That should help eliminate any
separation of the layers over time. |
|
|
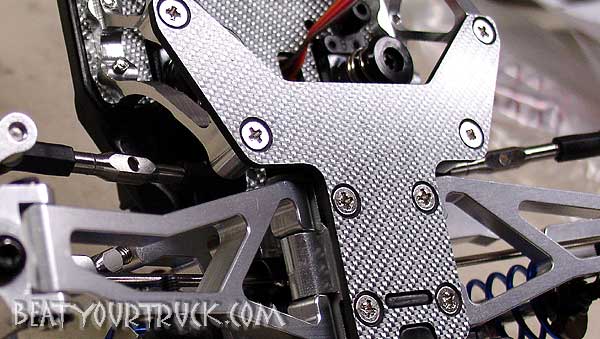
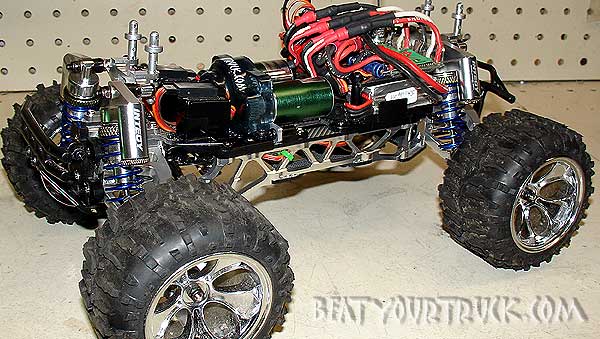
 GPM
aluminum chassis side rails (part number: MLT014X) were installed to
add additional strength and integrity to the chassis structure. The
rails look great however there were lots of machine marks on the edges
and the finish could have been little better. A few of the holes did
not line up perfectly however we were still able to install the rails
without much trouble. Some of the hardware seemed a little short however
there are so many screws that hold these rails on, it should be fine.
The rails are surprisingly light weight. If you are afraid of adding
something like this due too weight considerations; it is really not
an issue and when paired with the FFRC carbon fiber stuff, it should
balance out just fine.
GPM
aluminum chassis side rails (part number: MLT014X) were installed to
add additional strength and integrity to the chassis structure. The
rails look great however there were lots of machine marks on the edges
and the finish could have been little better. A few of the holes did
not line up perfectly however we were still able to install the rails
without much trouble. Some of the hardware seemed a little short however
there are so many screws that hold these rails on, it should be fine.
The rails are surprisingly light weight. If you are afraid of adding
something like this due too weight considerations; it is really not
an issue and when paired with the FFRC carbon fiber stuff, it should
balance out just fine.
|
|
|
| |
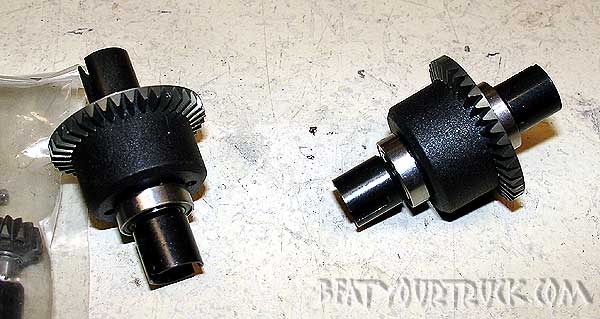
We started with the stock diff gears and they quickly exploded into many, many little pieces. WE went through a dozen sets of these trying different greases, shims….basically anything to make them last a little longer. Nothing worked. So the truck sat on the shelf for months…until GPM came out with some exciting new differential gears. We quickly pounced on these and they proved to be a vast improvement over the stock units, allowing us to get 5-6 packs (at best) through the truck before they blew out. Their method of failure was predictable. The pinion gear split every time. We did this GPM exercise for a total of 4 diff sets and gave up again. Back on the shelf.
At this point of constant and consistent failure/frustration, we were forced to make a decision. Either run with a single Mamba in hopes that the GPM or 3Racing solutions would hold up or scrap the entire project. Scrapping a project of this importance was really not an option. This project was created as a "thank you" for all the members that came together and purchased the MLST truck for BYT. Back to the drawing board!
|
 Ahh,
let the saga begin. In an effort to not get overly emotional, we will
stick to the facts and share with you the various setups we tried. If
you are an MLST owner, you are most likely familiar with all of these
and may have even tried some or all yourself.
Ahh,
let the saga begin. In an effort to not get overly emotional, we will
stick to the facts and share with you the various setups we tried. If
you are an MLST owner, you are most likely familiar with all of these
and may have even tried some or all yourself. 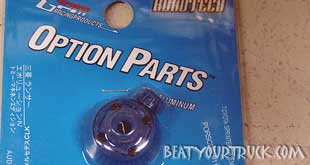 To
our pleasant surprise, while all this was going on 3Racing came out
with a ball diff for the front and rear of the truck. The bad thing
is that they do not come with pinions (duh….what were they thinking?).
We tried them with the stock pinions (pinions went boom) and then the
GPM pinions (split pinions again…no surprise).
To
our pleasant surprise, while all this was going on 3Racing came out
with a ball diff for the front and rear of the truck. The bad thing
is that they do not come with pinions (duh….what were they thinking?).
We tried them with the stock pinions (pinions went boom) and then the
GPM pinions (split pinions again…no surprise).
|
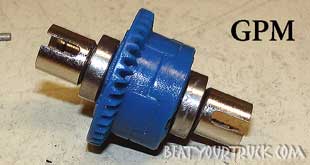
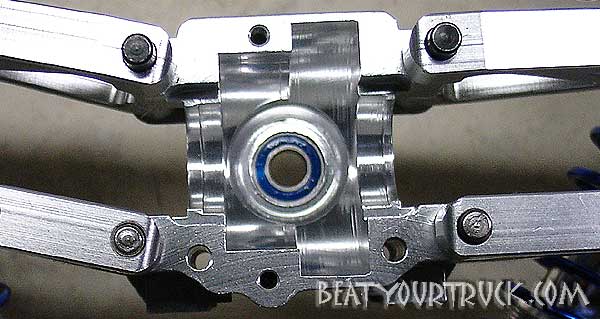
In order to keep our diff gears running straight and
true, we installed aluminum diff cases from GPM (part number: MLT012)
at the front and rear of the truck. These installed without a problem,
all holes lining up beautifully. The finish is good but again, machine
marks were present. Not a big deal as once the truck is back together,
you can barely see the cases. These are some pretty nice pieces especially
when you consider the amount of machining that goes into them. |
|
|
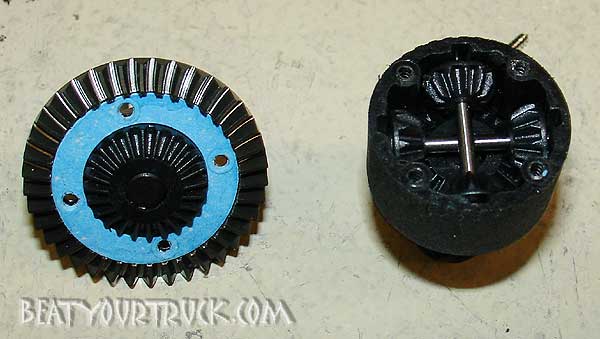
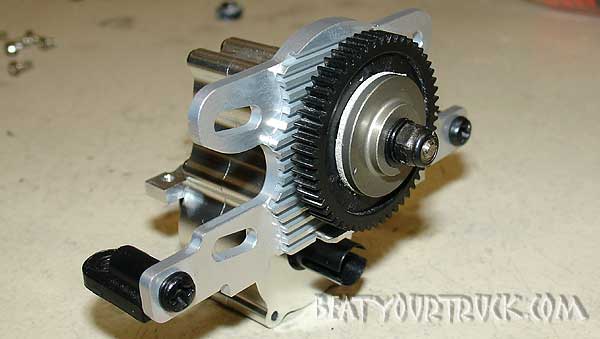
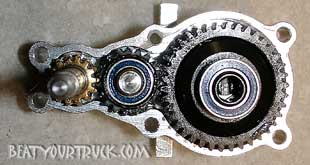 To
toughen up the center differential, we opted for a factory upgrade,
the Team Losi Ball Diff (part number: LOSB1125) and a GPM aluminum case
(part number: MLT038) to keep things in check. The ball diff and case
installed perfectly and have performed very well. Anyone that has torn
into the center diff will instantly notice the similarities between
it and the Losi Mini-T transmission. It’s the same setup, just
a different case!
To
toughen up the center differential, we opted for a factory upgrade,
the Team Losi Ball Diff (part number: LOSB1125) and a GPM aluminum case
(part number: MLT038) to keep things in check. The ball diff and case
installed perfectly and have performed very well. Anyone that has torn
into the center diff will instantly notice the similarities between
it and the Losi Mini-T transmission. It’s the same setup, just
a different case! | |
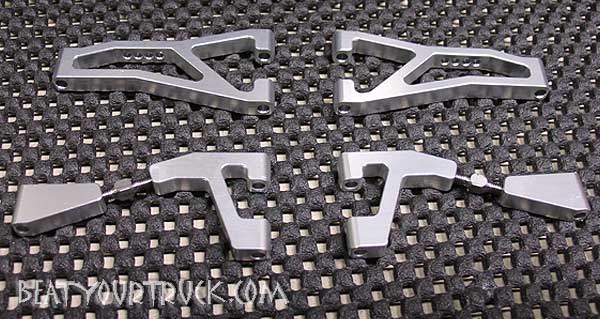
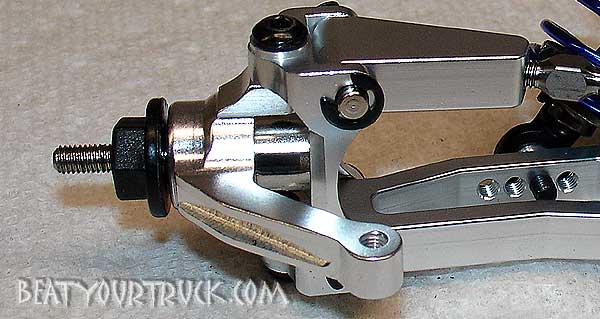
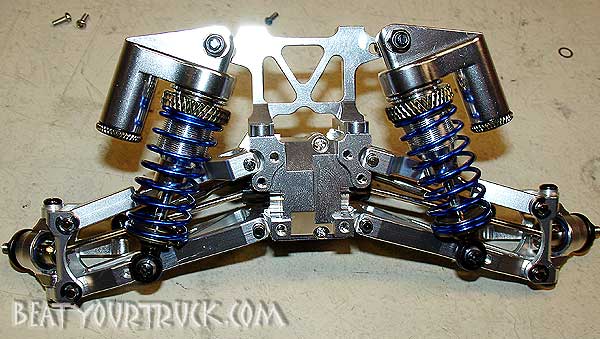
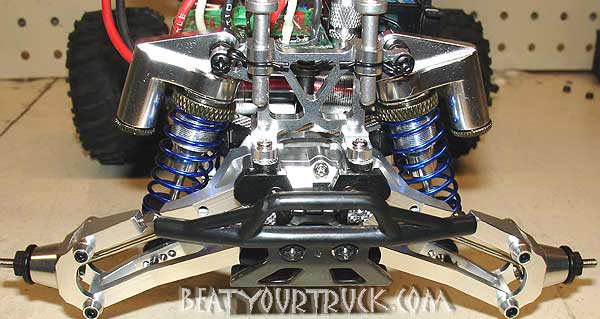
The upper arms are adjustable via a turnbuckle. Now, we know what you are thinking! It looks like a potential weak spot right? Negative! FFRC did not just install any old piece of junk on their arms. They stepped up to the plate and used 3mm Lunsford titanium turnbuckles in the upper arm adjustment. This is a great move and is exactly what we would have chosen to use. The lower arms feature additional shock mounting holes, a welcomed improvement over the stockers. Just look at those arms! The only thing they are missing is the word
“BEEFY” laser-cut into them! Fit and finish is 110%. Hinge
pins fit nice and snug to the stock hubs and diff cases while moving
smoothly and the threads for the shock mountings are well done. No sharp
corners anywhere that would cause a stress riser and the finish is very
good (no machine marks to be found). Did we mention how beefy these
arms are? |
|
| |
|
|
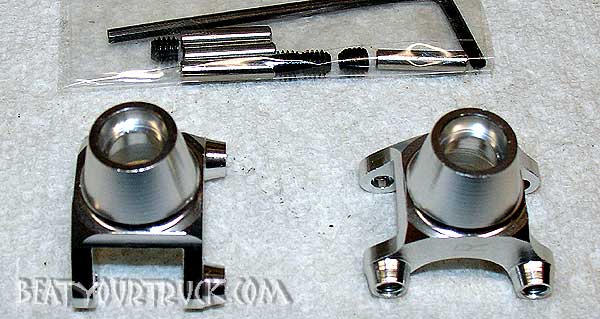
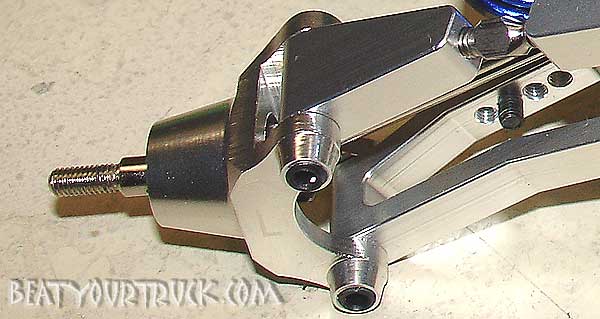
At the rear of the truck, we found a new setup that we just had to try out. Hot Racing offers an aluminum, fixed rear hub/knuckle system (part number: MLT2208) that eliminates the rear turnbuckles and is quite beefy. All the required parts are included in the package, even a hex wrench. The left and right sides are clearly marked and installation was a breeze. Put the hub in place, insert the new hinge pins and install the retaining screws (with a little blue thread locker). These really look great however all of our excitement was lost after we bolted the rear wheels on and noticed the significant amount of slop in the hinge pin tolerance. The pins are too small or the knuckles have too large of a hole in them…either way, they make for sloppy rear wheels. We like the idea. The parts are just not quite right. The thought of a tolerance issue between the FFRC arms and the Hot Racing components comes to mind however the FFRC arms work perfectly with the stock hub setup so we are confident that the problem is with the Hot Racing knuckles. |
|
|
|
| |
|

|
|
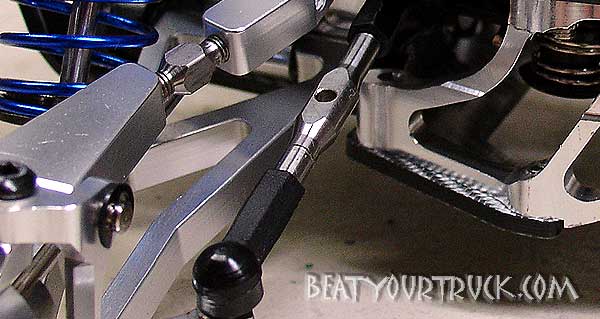
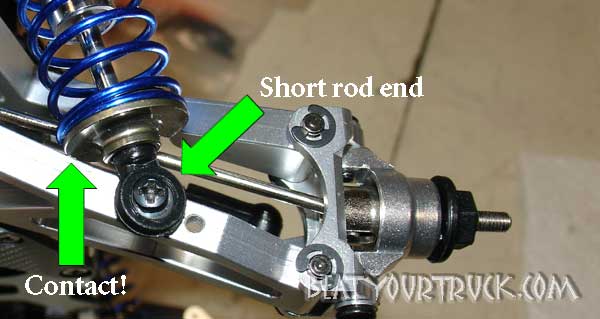
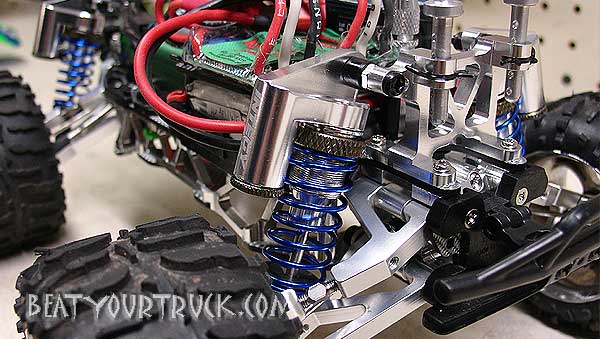
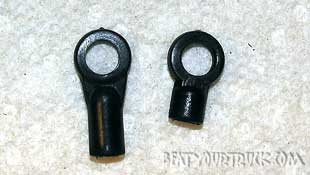 The
shocks come with short lower rod ends installed and while these would
bolt up to the lower suspension arms, we experienced contact between
the arm and the lower spring retainer. We installed the extended rod
ends to the shocks and they work beautifully.
The
shocks come with short lower rod ends installed and while these would
bolt up to the lower suspension arms, we experienced contact between
the arm and the lower spring retainer. We installed the extended rod
ends to the shocks and they work beautifully.
|
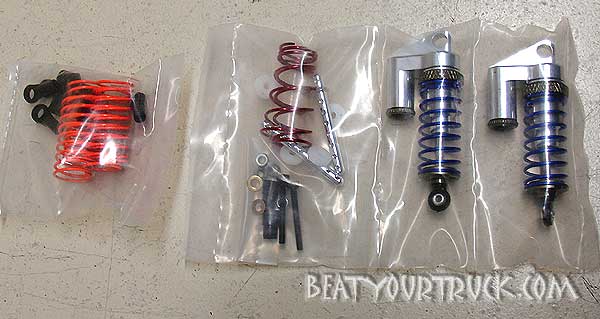
Our first few runs were made with the included blue springs (medium) and they felt too stiff. The truck was too bouncy. We swapped them out for the orange springs (softer), backed off the threaded collars and the handling is much better. These are really nice shocks and have given us zero problems. No leaks and they are still moving smoothly. The only bad thing we can find with them is that the reservoirs hit the body. Be prepared to jack your body up (they include extended body posts with the shock kit but our FFRC Aluminum posts work fine with our body and mounting height) or do some trimming. We did a combination of mounting it higher and trimming our shell. This contact was mostly in the front of the truck. Not a huge deal but it is worth mentioning.
A miscellaneous item we added to our project was FullForceRC aluminum body posts (part number: MLT001). These work great and added a little extra “bling” to our baby. There is plenty of adjustment up and down to get the body just where you want it. |
|
| |
|
|
|
|
|
| |
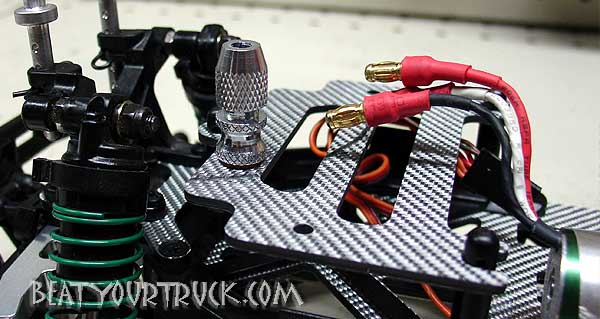
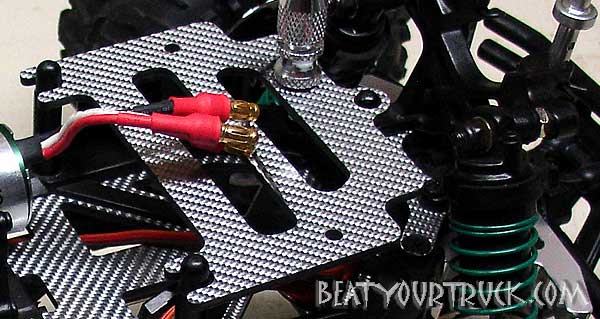
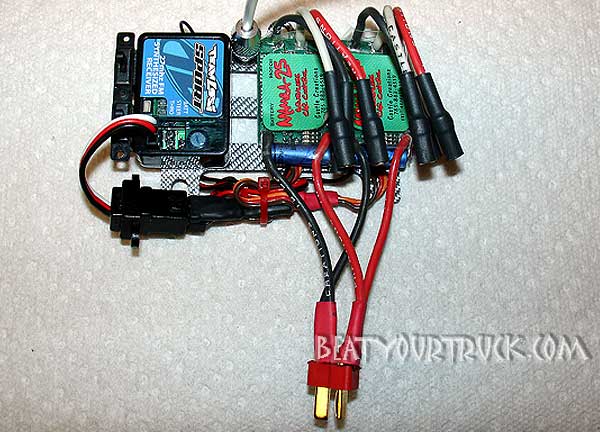
#1 - The recommended battery is the Apogee 1570mah LiPo pack (2 or 3 cell….we are using the 3 cell) #2 - Solder BOTH positive and negative battery input wires on the Electronic Speed Controllers (ESC) to the same Deans ultra male connector. #3 – Use a “Y” harness
to connect both ESC receiver leads into the throttle channel of the
receiver. (the shorter the wires the better). We found a double
link connector at or local hobby store that works well and is only 3
inches long (MPI Maxx part number 3163, double link, universal).
|

|
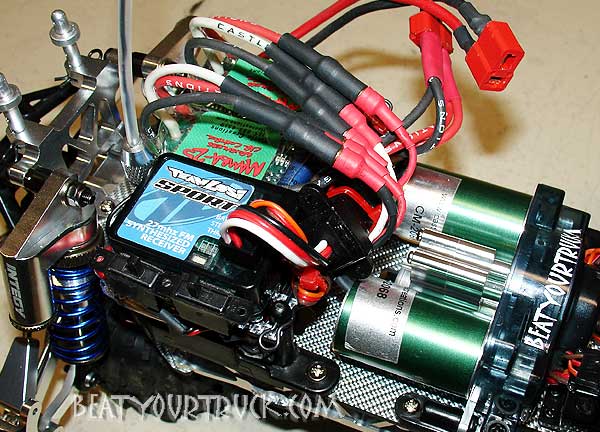
We followed these instructions to the letter and our truck is smooth and fast. It is not 60MPH fast due to the gearing of the truck however that is not what we wanted anyway. Beyond the “hey…I got dual Mamba’s in this thing” factor, we wanted torque and lots of it. That is exactly what we received with this setup.
To upgrade our slipper, we installed the Racer’s Edge hard coated
slipper package (part number: RCEK1714). We have used this same slipper
setup on our Project Rocket Ship Mini-T for years and it is still going
strong. It worked very well on the MLST with the dual Mamba setup and
enabled us to give it just enough slip on take off for smoother and
straighter launches. |
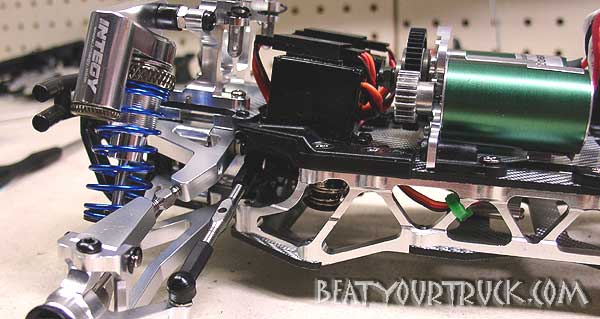
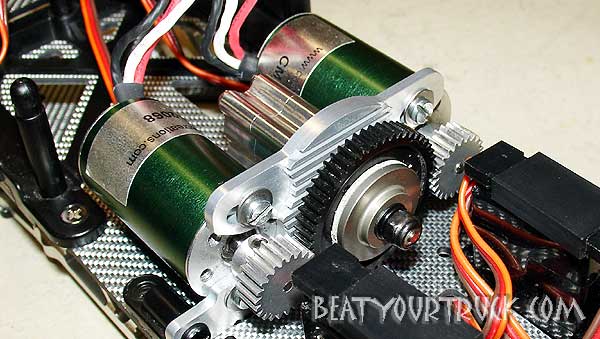
 To
hold our dual Mamba setup tight and provide some extra motor cooling,
we installed the GPM aluminum motor plate with heat sync (part number:
MLT018). Once we installed this and put our gear cover back on, we realized
it is pretty much a complete waste of money. The heat sync is inside
the gear cover where there is no outside air circulation! We highly
doubt that this provides any benefit at all. Skip it. We did see another
motor plate / heat sync that would work better. It is from Hot Racing
and has the heat sync mounted above the cover where it has air circulation.
Check that one out before the GPM.
To
hold our dual Mamba setup tight and provide some extra motor cooling,
we installed the GPM aluminum motor plate with heat sync (part number:
MLT018). Once we installed this and put our gear cover back on, we realized
it is pretty much a complete waste of money. The heat sync is inside
the gear cover where there is no outside air circulation! We highly
doubt that this provides any benefit at all. Skip it. We did see another
motor plate / heat sync that would work better. It is from Hot Racing
and has the heat sync mounted above the cover where it has air circulation.
Check that one out before the GPM.
|
| |
|
|
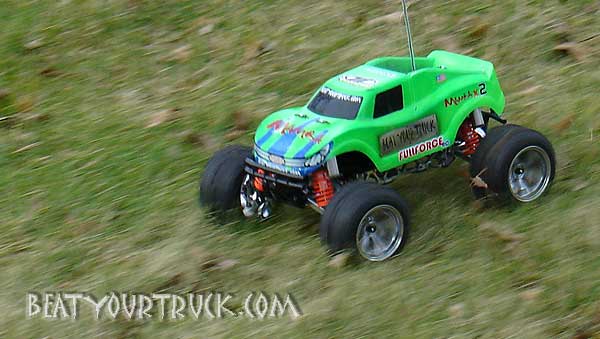
It is Winter here in Wisconsin as I type this and our grass is dormant (and I cut it pretty short at the end of the growing season). The MMMLST owns the grass. Keep in mind that you should take care to only run it in the short stuff. Taller grass will get the motors and ESC’s hot very quickly! The torque is incredible and when you give it some gas, it almost seems to get moving so fast that it is just skipping across the top of the lawn! What a blast! The ground clearance, aggressive tire tread and dual Mamba power is made to conquer the short grass. The grass offers a little more cushion on landings and cartwheels as well and that is not a bad thing. Tearing around the dirt is also a ton of fun with the MMMLST. Grab a handful of WOT and watch the tires knife and the dirt fly. The diffs seem to do a pretty good job in distributing the power from front to back and left to right. The stock tires are ok in the dirt however a good pair of step pins would have been perfect in the dirt we were flying on. There is simply too much power to put to the ground. The low timing settings on the Mamba system does help a lot but even with that, it is quite aggressive and doing all wheel slides and donuts is not a problem. All the humps and bumps were soaked up with no problem by the little piggy’s. We did not sky the little guy overly high, four feet of air was probably the max we were launching on a regular basis. Come on! It’s only an 18th scale truck. Our MMMLST does not seem to fly very well? Perhaps we are not used
to airing it out yet or perhaps we are just cruddy drivers? Maybe it
is some of both? We will be playing with some settings to try and reduce
the nose diving we are experiencing during flight. |
|
| |
Another area for upgrade would be the dog bones. CVD’s would
smooth out the drive train and potentially reduce some drive train stress
from dog bone binding. Plan on a full set of MIP’s hitting this
truck before Spring arrives. |
|
| |
|
The FullForce RC components are as they have always been, very high in quality and performance. We find no gripes with any of the FFRC pieces. After dealing with some more “middle of the road” type products on this project, our appreciation for top quality has gone up. Thanks FFRC. The GPM parts, in general, were full of sharp edges and corners. These
sharp cuts are places for cracks to appear. We are not knocking them.
They are what they are. Inexpensive aluminum parts. For the serious
basher, be selective about what parts you invest your money into. Our
favorite GPM part in this project was the diff cases (front, rear and
center). They were well done and fit very well.
* Part number listed may not be the manufacturers number. It may be the part number from the web site the part was purchased from. **Shipping, handling, tax and other unknown costs not included. Prices shown are an approximation. ***PFM does have 2 cell 1570mah Lipo's in stock and this would be an excellent replacement. |
||||||||||||||||||||||||||||||||||||||||||||||||||||||||||||||||||||||||||||||||||||||||||||||||||||||||||||||||||||||||||||||||||||||||
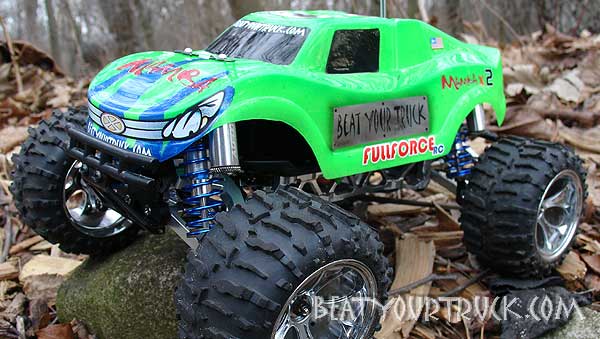
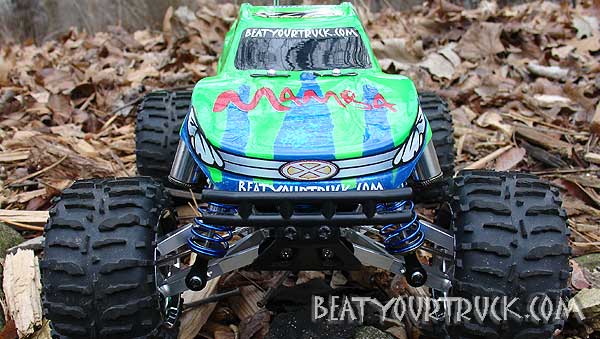
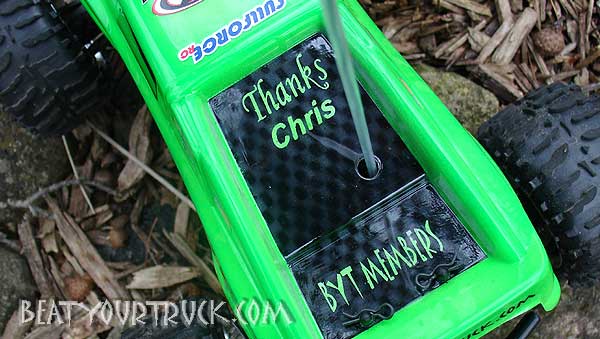
My favorite
part of this entire, incredible 1/18th scale truck is the body that
members of the BYT Forum had custom painted for me. Not only did they
surprise me with the MLST, they had this body painted! In fact I am
going to retire the body soon as to not destroy it. It will live in
the BYT shop as a constant reminder of what BYT is all about. |
Advertise with Beat Your Truck * Donate to Beat Your Truck