

|
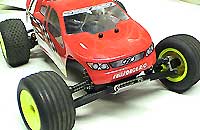
 Team Losi has done a great job shaking up the RC world with their Mini-T. A SLEW of "mini" RC vehicles have popped onto the market but dare we say none have had the success thus far as the Losi Mini-T. With that success, comes one of our favorite things.....hop-ups! It's what every true RC fanatic thinks about 24 hours a day "I can't wait to get some shiny this or super strong that for my truck."
FullForce RC was on the ball with the release of the Mini-T offering a number of components to make your Mini-T tougher and cooler looking to boot. Let's take a look at some of the items they have for our favorite little guy.
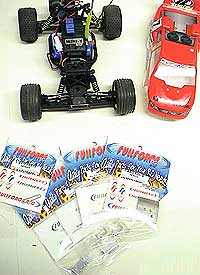
Here's what we will be installing and testing:
- Aluminum front pivot block
- Aluminum front C-hubs
- Titanium front hinge pin brace
- Titanium front skid plate
- Aluminum rear pivot block
- Titanium rear hinge pin brace
- Rubber sealed ball bearing kit
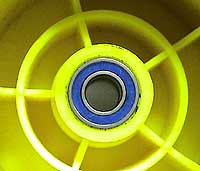 INSTALLATION & REVIEW - FRONT END: Let's start with the front end and the first thing to do is remove the front tires. With the tires off, it's time to remove the plastic bushings and install the ultra-sweet rubber sealed bearings in the front wheels. Give them a firm push into place. We heard ours "click" when they hit the right spot. You want to make sure they are firmly seated in the rims. Getting the bushings out may take a little coaxing but it is not a problem. We actually used a coarse-threaded wood screw and turned it by hand into the bushings and gave them a tug. This popped them out quickly and easily. Otherwise a small screwdriver will do the trick. Once you have both front wheels done, open the closest window and throw the plastic bushings as far as you possibly can. They are speed robbing items and installing bearings is one of the best hop-ups anyone can do to any RC vehicle that uses bushings. We have seen statistics that say bearings in the Mini-T will give you an extra 4/10 of a MPH. That's a serious speed gain just by installing quality bearings like these. They should also give you a little more run time as well. INSTALLATION & REVIEW - FRONT END: Let's start with the front end and the first thing to do is remove the front tires. With the tires off, it's time to remove the plastic bushings and install the ultra-sweet rubber sealed bearings in the front wheels. Give them a firm push into place. We heard ours "click" when they hit the right spot. You want to make sure they are firmly seated in the rims. Getting the bushings out may take a little coaxing but it is not a problem. We actually used a coarse-threaded wood screw and turned it by hand into the bushings and gave them a tug. This popped them out quickly and easily. Otherwise a small screwdriver will do the trick. Once you have both front wheels done, open the closest window and throw the plastic bushings as far as you possibly can. They are speed robbing items and installing bearings is one of the best hop-ups anyone can do to any RC vehicle that uses bushings. We have seen statistics that say bearings in the Mini-T will give you an extra 4/10 of a MPH. That's a serious speed gain just by installing quality bearings like these. They should also give you a little more run time as well.
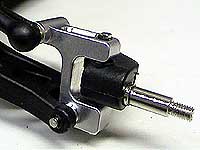
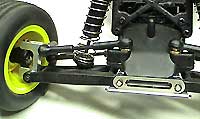
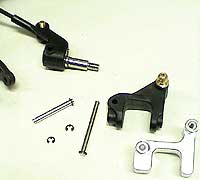 Leave the tires off for now and let's install the front C-hubs. Man are these ever sweet! The detail is great, all the way down to the nice smooth edges and threaded holes for the turnbuckle balls to screw into. DIsassemble the front spindle area as shown in the picture to the right. Note that you do not have to remove the steering turnbuckle ball end from the plastic spindle. If you can avoid popping these on and off, it is a good thing. Once you take them off, they seem to come off easier in impacts etc. We used the tip of a hobby knife to pry off the SUPER small e-clips. Take your time and try hard not to loose them. In fact it might be a good idea to have a couple of extra on hand just in case. Swap the threaded ball end from the old plastic c-hub onto the new aluminum piece. Also note that there is not a "right" or "left" c-hub. It just depends on how you mount it. Put everything back into place being sure that everything moves freely with no binding. Leave the tires off for now and let's install the front C-hubs. Man are these ever sweet! The detail is great, all the way down to the nice smooth edges and threaded holes for the turnbuckle balls to screw into. DIsassemble the front spindle area as shown in the picture to the right. Note that you do not have to remove the steering turnbuckle ball end from the plastic spindle. If you can avoid popping these on and off, it is a good thing. Once you take them off, they seem to come off easier in impacts etc. We used the tip of a hobby knife to pry off the SUPER small e-clips. Take your time and try hard not to loose them. In fact it might be a good idea to have a couple of extra on hand just in case. Swap the threaded ball end from the old plastic c-hub onto the new aluminum piece. Also note that there is not a "right" or "left" c-hub. It just depends on how you mount it. Put everything back into place being sure that everything moves freely with no binding. 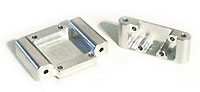 When reinstalling the itsy bitsy e-clips, it is best to take your time and just use your fingernail to pop them back into place. Anything more than that is not necessary and you will stand a good chance of bending them (but that's ok...you have extras right?). If you are having trouble installing the vertical pin, check the axle. It has a hole in it that the pin must go through. The FFRC C-hubs fit beautifully and are WAY stronger than the stock plastic setup. All the corners have nice radiuses which eliminates stress points (weak spots). You would have a difficult time dealing out any hurt to these hubs. Very, very nice stuff. When reinstalling the itsy bitsy e-clips, it is best to take your time and just use your fingernail to pop them back into place. Anything more than that is not necessary and you will stand a good chance of bending them (but that's ok...you have extras right?). If you are having trouble installing the vertical pin, check the axle. It has a hole in it that the pin must go through. The FFRC C-hubs fit beautifully and are WAY stronger than the stock plastic setup. All the corners have nice radiuses which eliminates stress points (weak spots). You would have a difficult time dealing out any hurt to these hubs. Very, very nice stuff.
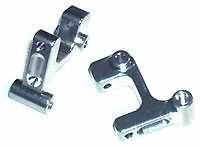
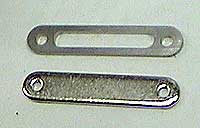
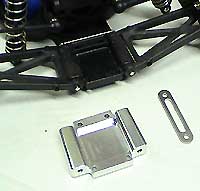
 OK...onto the titanium front skid plate, front hinge pin brace and aluminum front pivot block. The skid is an easy one. Remove the four screws and just set them aside for now. Do whatever you want with the plastic skid....it's probably not worth the trouble to put it on E-bay :) With the front skid plate off, the plastic front pivot block will also be loose. Remove the hinge pins, install the pivot block and titanium hinge pin brace. The FFRC stuff fits really well. No problems at all getting anything to line up or screw into place. This is always a welcome feature as it saves mass amounts of aggravation trying to make something "new and improved" fit into your truck. OK...onto the titanium front skid plate, front hinge pin brace and aluminum front pivot block. The skid is an easy one. Remove the four screws and just set them aside for now. Do whatever you want with the plastic skid....it's probably not worth the trouble to put it on E-bay :) With the front skid plate off, the plastic front pivot block will also be loose. Remove the hinge pins, install the pivot block and titanium hinge pin brace. The FFRC stuff fits really well. No problems at all getting anything to line up or screw into place. This is always a welcome feature as it saves mass amounts of aggravation trying to make something "new and improved" fit into your truck.
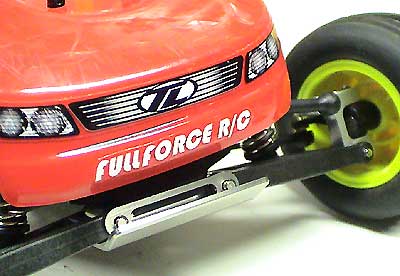
With the new block and brace in place, grab the titanium skid plate and put everything back together again, using the original screws. We noticed that the arms felt a little more solid (less front to back slop) with the new pivot block in place. The new skid plate is considerably longer than the plastic unit. It also has a larger upward bend in the front. Both of these subtle features should add some extra protection to the front of your Mini-T. The screw holes are countersunk so you won't be snagging the carpet or dirt with screw heads. Excellent feature. The hinge braces are also hollowed in the center rather than being a solid piece. This is a nice touch as it removes a little weight and looks cool too. They also seem much more stiff than the steel plates...which they should be....gotta love titanium!
Install the front tires, taking care not to over tighten them (be sure to spin them as you tighten the wheel nut), and you are done with the front end. Did you notice how easily the front wheel spin? VERY nice. Silky smooth. If you have the wheel nuts installed correctly (not too tight), they should spin for LONG time. And I must say the Mini-T is looking killer so far!
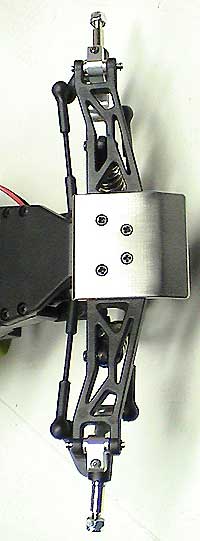
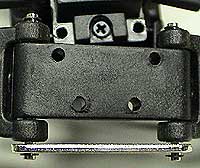
 INSTALLATION & REVIEW - REAR END: Alright! On to the rear of the truck. Start by removing the four screws on the underside of the truck that hold the transmission assembly in (see picture to the right - red circles). There is one more trans bolt near the rear shock tower. It is a long bolt and has a nut on the end. Remove that one also. Unhook the motor wires and remove the transmission and motor assembly. Set it off to the side, out of the way, along with the drive axles. (FYI - The green circles in the picture to the right indicate the bottom mounting screws for the rear motor protector and the yellow circle shows a lower rear shock tower mounting screw location). INSTALLATION & REVIEW - REAR END: Alright! On to the rear of the truck. Start by removing the four screws on the underside of the truck that hold the transmission assembly in (see picture to the right - red circles). There is one more trans bolt near the rear shock tower. It is a long bolt and has a nut on the end. Remove that one also. Unhook the motor wires and remove the transmission and motor assembly. Set it off to the side, out of the way, along with the drive axles. (FYI - The green circles in the picture to the right indicate the bottom mounting screws for the rear motor protector and the yellow circle shows a lower rear shock tower mounting screw location).
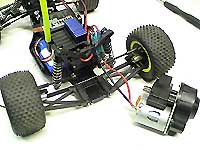
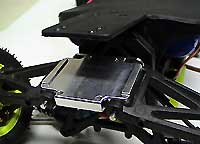
We recommend removing the lower rear shock mounting screws so you are not fighting the shocks during disassembly and reassembly. The rear pivot block is now accessible and can be removed. Install the shiny new FFRC unit in its place and don't forget about the titanium pivot brace. Once again, everything fits into place nicely and with no assembly problems whatsoever....just as we would expect. The pivot blocks are massive and offer huge amounts of strength. This is evident just by looking at them.
 Reinstall the transmission, dog bones and remount the shocks. Remove the rear tires and install your new bearings.....ohhh baby they spin SO smooth! Same deal as the front end. Make sure not to over tighten the wheel nuts and give them a few spins to make sure there is no drag. Reinstall the transmission, dog bones and remount the shocks. Remove the rear tires and install your new bearings.....ohhh baby they spin SO smooth! Same deal as the front end. Make sure not to over tighten the wheel nuts and give them a few spins to make sure there is no drag.
Give it a once over to make sure you don't have any extra screws and you are good to go!
SUMMARY: We have been hitting the carpet, pavement and dirt hard for the past few weeks. So far we have gone through about 8 battery packs with no ill effects...except for broken servo mounts, broken shock towers, etc. Not a whimper from any of the FFRC parts though. Let's face it people....it is going to take a lot to break any of these parts on a truck like the Mini-T! We do not expect to replace any of these parts ever.....granted anything is possible but HIGHLY UNLIKELY! FFRC has put together some very well made, great priced items for your Mini-T that you should not overlook.
Of course it makes sense to buy more than one item at a time for shipping costs and for installation time but if we had to choose the order of "importance" (what to buy first from these parts):
#1 - Bearings
#2 - Front skid plate
#3 - Pivot blocks
#4 - C-hubs
#5 - Hinge pin braces
All in all, FFRC has done it again. They are offering great parts at great prices. Even though the parts are for a "mini" RC, they still took the development and design of these parts very seriously. What else can we say other than we love em!
Visit the FullForce RC web site to see the latest on pricing for these and other great RC parts.
|